When we take photographs today especially on our phones we don’t consider them as historical documents. Photography is more ubiquitous than ever and for all likelihood our pictures will quietly rot away on a memory card or be deleted during routine maintenance in a dark corner of a nameless datacenter. Maybe they will become part of some AI as a minuscule fragment of the training set but never actually preserved. Besides who really thinks about mundane moments of life like a walk in the park with family as important in a historical context.
But when we take a random sample of 100 years of photographs, chances are that we found them quite interesting.
Of course photography was much less common due to cost, availability of gear and materials and the level of skill needed to take good pictures. People must have thought a bit longer before committing to pressing the shutter. Less photos were taken but those which survived to the present day are more likely to hold something special. The good news is that the medium of film and especially glass plates are quite resilient if kept in reasonable conditions. They are more likely to survive than anything on a hard-drive even though the jury is still out regarding archivability of digital media.
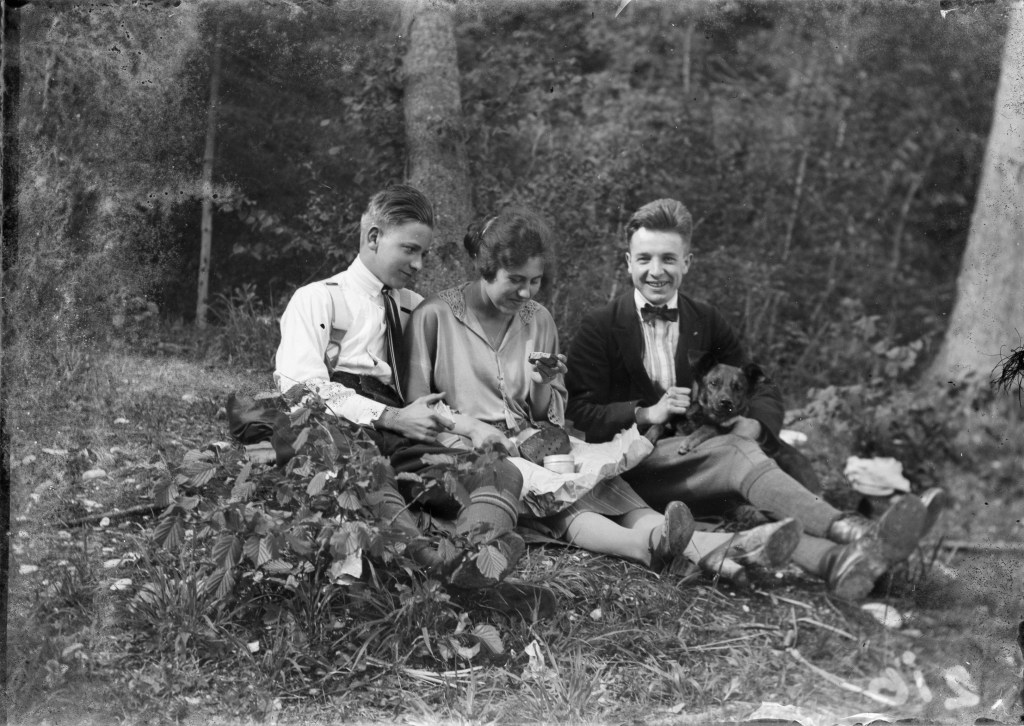
But I am already on a tangent, so let’s have a look at today’s subject which is a lot of 30 6x9cm glass-plates found by my father on a flohmarkt in Hungary.
Each of these photographs are stored in a paper sleeve with some text in German and the date 1923.
Such a find is always exciting to me. Not only that we can admire the quality of such old photographs, but we can get a glance into the past. Of course this is true with any photographs, but the fact that these are literally 100 years old and that the very silver on the glass witnessed these moments somehow makes the experience special.
I enjoy researching old photos and thankfully this time there are many leads to start on. On the paper sleeves there is the date of 1923 as well as the location. In some cases it is just the country, but other times the name of the city or a landmark. It is a bit hard to read the old style handwriting for me, but it seems that the photos are mostly from Germany (München, Herrenchiemsee) and somewhere from rural Hungary as well as a skiing at an unknown location.
The landmarks are easy to identify with the help of Google Image Search and it is real fun to check how these places look like today on Street View. In many cases there are archive photos can be found online from almost exact spots e.g.: feeding pigeons but from different years.
Herrenchiemsee is a complex of royal buildings on Herreninsel, the largest island in the Chiemsee lake, in southern Bavaria, Germany. Together with the neighbouring isle of Frauenchiemsee and the uninhabited Krautinsel, it forms the municipality of Chiemsee, located about 60 kilometres (37 mi) southeast of Munich.
To pinpoint exact locations is a lot harder for these pictures due to the lack of recognizable landmarks. But one sleeve has a text which I read as Csikéria, which is a small village at the south border of Hungary.
One thing is for sure, villages were a lot more different at the time as today. Parts of big cities with a bit of luck have survived largely unchanged the tides of the 20th century, but the rural world is quite a different story. The traditionally built houses made of adobe and covered with straw are gone a long time ago though they start to become fashionable again. There were hardly any infrastructure, only dirt roads, a well to take drinking water and a lonely telephone/power pole can be seen on the pictures. There are no automobiles seen apart from one example in München, but multiple horse carriages.
There is one picture with someone holding a newspaper with the title “A NÉP” (The Folk), but unfortunately there is not much more readable on it.
Clothing is another great source of information. For example there are a handful of pictures of a man wearing military uniform. The demarcations make it possible to identify nationality and rank. I will need to find some help regarding the identification, but it is likely to be a Hungarian uniform.
Skiing
The cross on the peak was/is very typical in the Alps, but it is not possible to tell where these photos were taken. I really enjoy looking at the details of their cloths, accessories such us glasses and pipe and skiing gear. No plastic can be seen here.
Trips and fun
Camera speculations
I would really love to know what camera/lens has been used to take these photos. We know that it took 6x9cm glass plates. It was released before 1923 and most likely by a European manufacturer. It is also likely that it was small and light enough to take it to adventures and shoot it handheld.
I imagine it mast have been a folder style camera from Voigtländer, Zeiss or from a similar brand. Like the Voigtländer Bergheil.
It might be able to guess the he camera model more accurately by the shape of the “film” gate and maybe based on the flare and bokeh characteristics of the lens, but for the time being I am only able to speculate.
Closing thoughts
There are many unknowns around these photographs. We don’t know who they are, if they were living in Hungary and had a chance to visit Germany or the other way around. We do not know what they did for the living. It is clear that they could afford nice cloths, activities such as skiing and not to mention photography.
There are recurring faces, but we have no idea if they were friends, family or anything else. One thing is sure, they were people trying to enjoy their lives in very turbulent times. The first World War was behind them, but they had to face a deep economic crisis and the next big war was just a few years ahead. In any case through these photos we got a little glance into their lives and we can reflect a bit about what has changed during 100 years.
My father told me that he may have some negatives left from the lot he bought. If I can get some more scanned or I manage to find out more about the pictures and there is interest, I may write a follow up to these post. If you’e found this interesting or you have some information (you recognise someone or a place, maybe have a better idea about the camera ), please write a comment.
Light quality is extremely important to a photographer, just like snow for an Inuit. We have countless names for the different types of light while any average people would only call them “strong” or “weak”. The amount of light we get is very easy to measure and describe. But the quality is a far more subtle, much harder to formalize concept and therefore much more interesting to me. Modern cameras can handle low light extremely well thus photography is now possible under such difficult circumstances no one could be foreseen just until a few years before. But high sensitivity sensors with great quantum efficiency and extremely sophisticated noise reduction processing cannot create great photographs just by extending the lower bound of minimum illumination necessary to capture an image. Although these new tools certainly aid the photographing process, the quality of light (among other factors) is and always will be key to a good image.
I am currently experimenting with mainly available light, trying to find situations which work for me so I can get the results I like in a somewhat predictable manner. One of my favorite spots lately is the door of our balcony. In my opinion, this location has nearly ideal light conditions for portraits during most of the day. The balcony is relatively deep, and only the front is open (sides are solid walls), then comes the big door followed by a deep room with white walls and furniture.
This setup has a similar effect to a soft-box. Light comes through in a beautiful evenly distributed, soft way, which then decays rapidly as it penetrates into the room. A subject placed close to the door can be lit very well with a strongly directional but soft light while the background is lost in darkness.
I have taken several portraits at this place using different formats (APS-C, 35mm, 6x6cm), films and digital sensors, and a small, but representative selection can be seen in this post. I think it is interesting to see next to each other similar shoots using similar focal length but with vastly different capturing technology.
Brigi, Pentacon Six TL, Carl Zeiss Jena Biometar 120mm f/2.8, Fuji Acros 100 (expired), Rodinal, Canoscan 9900F Comment CAMERA 9900F View full size 1000×1000 Brigi
Eszti, Leica M2, Zeiss Sonnar 50mm f/1.5 ZM, Kodak Professional Elite Color 400, Canoscan 9900F
Eszti, Canon 5D, Canon 50mm f/1.8 II
The conclusion is that, no matter what your medium is, good light (and composition) could always give respectable results but technology does not save the day if the light quality is poor for the subject. But it is again another subjective property, what is poor light for a photographer for a given purpose, could be magnificent for another. Nevertheless, I think it is crucial to study light as a photographer, amateurs and professionals alike.
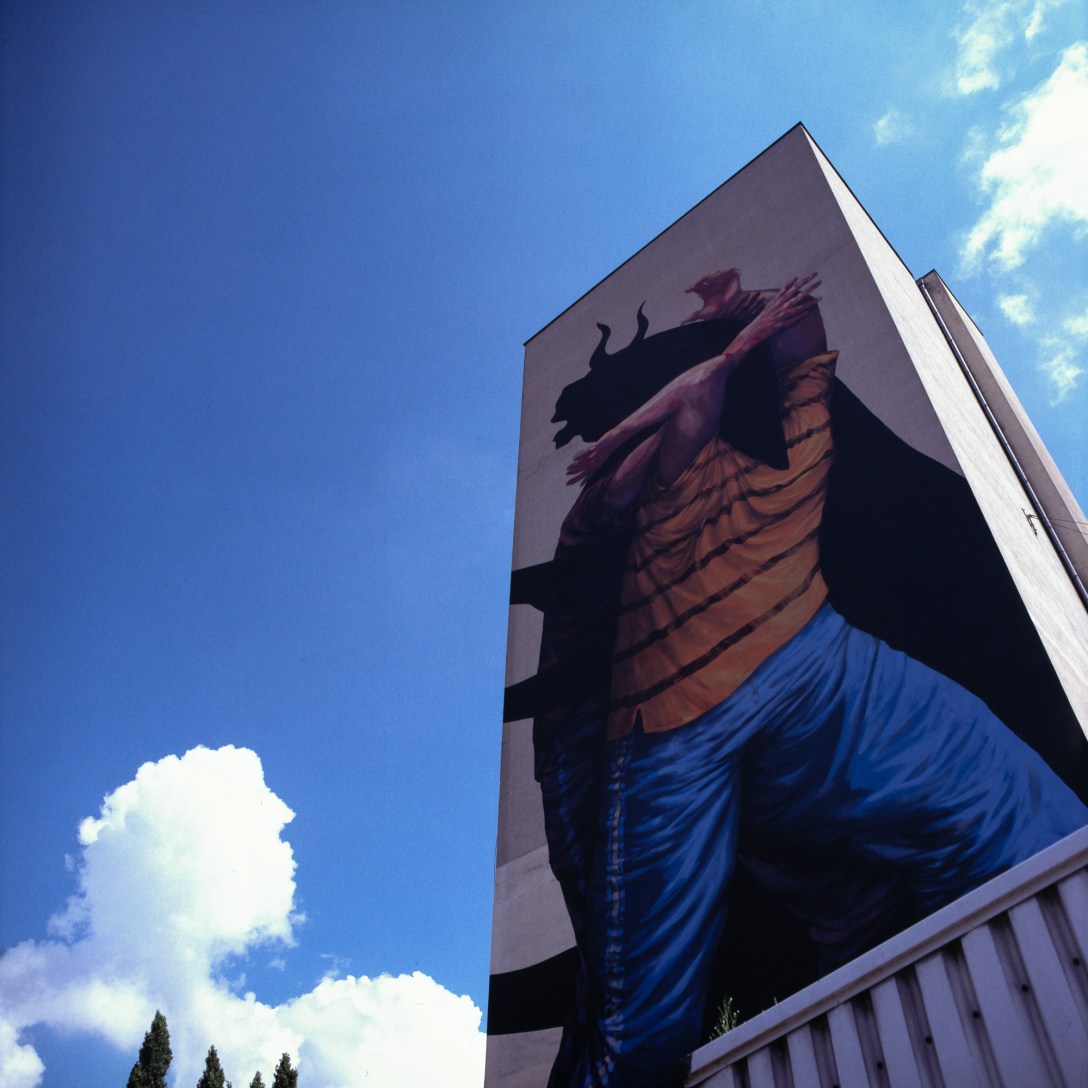
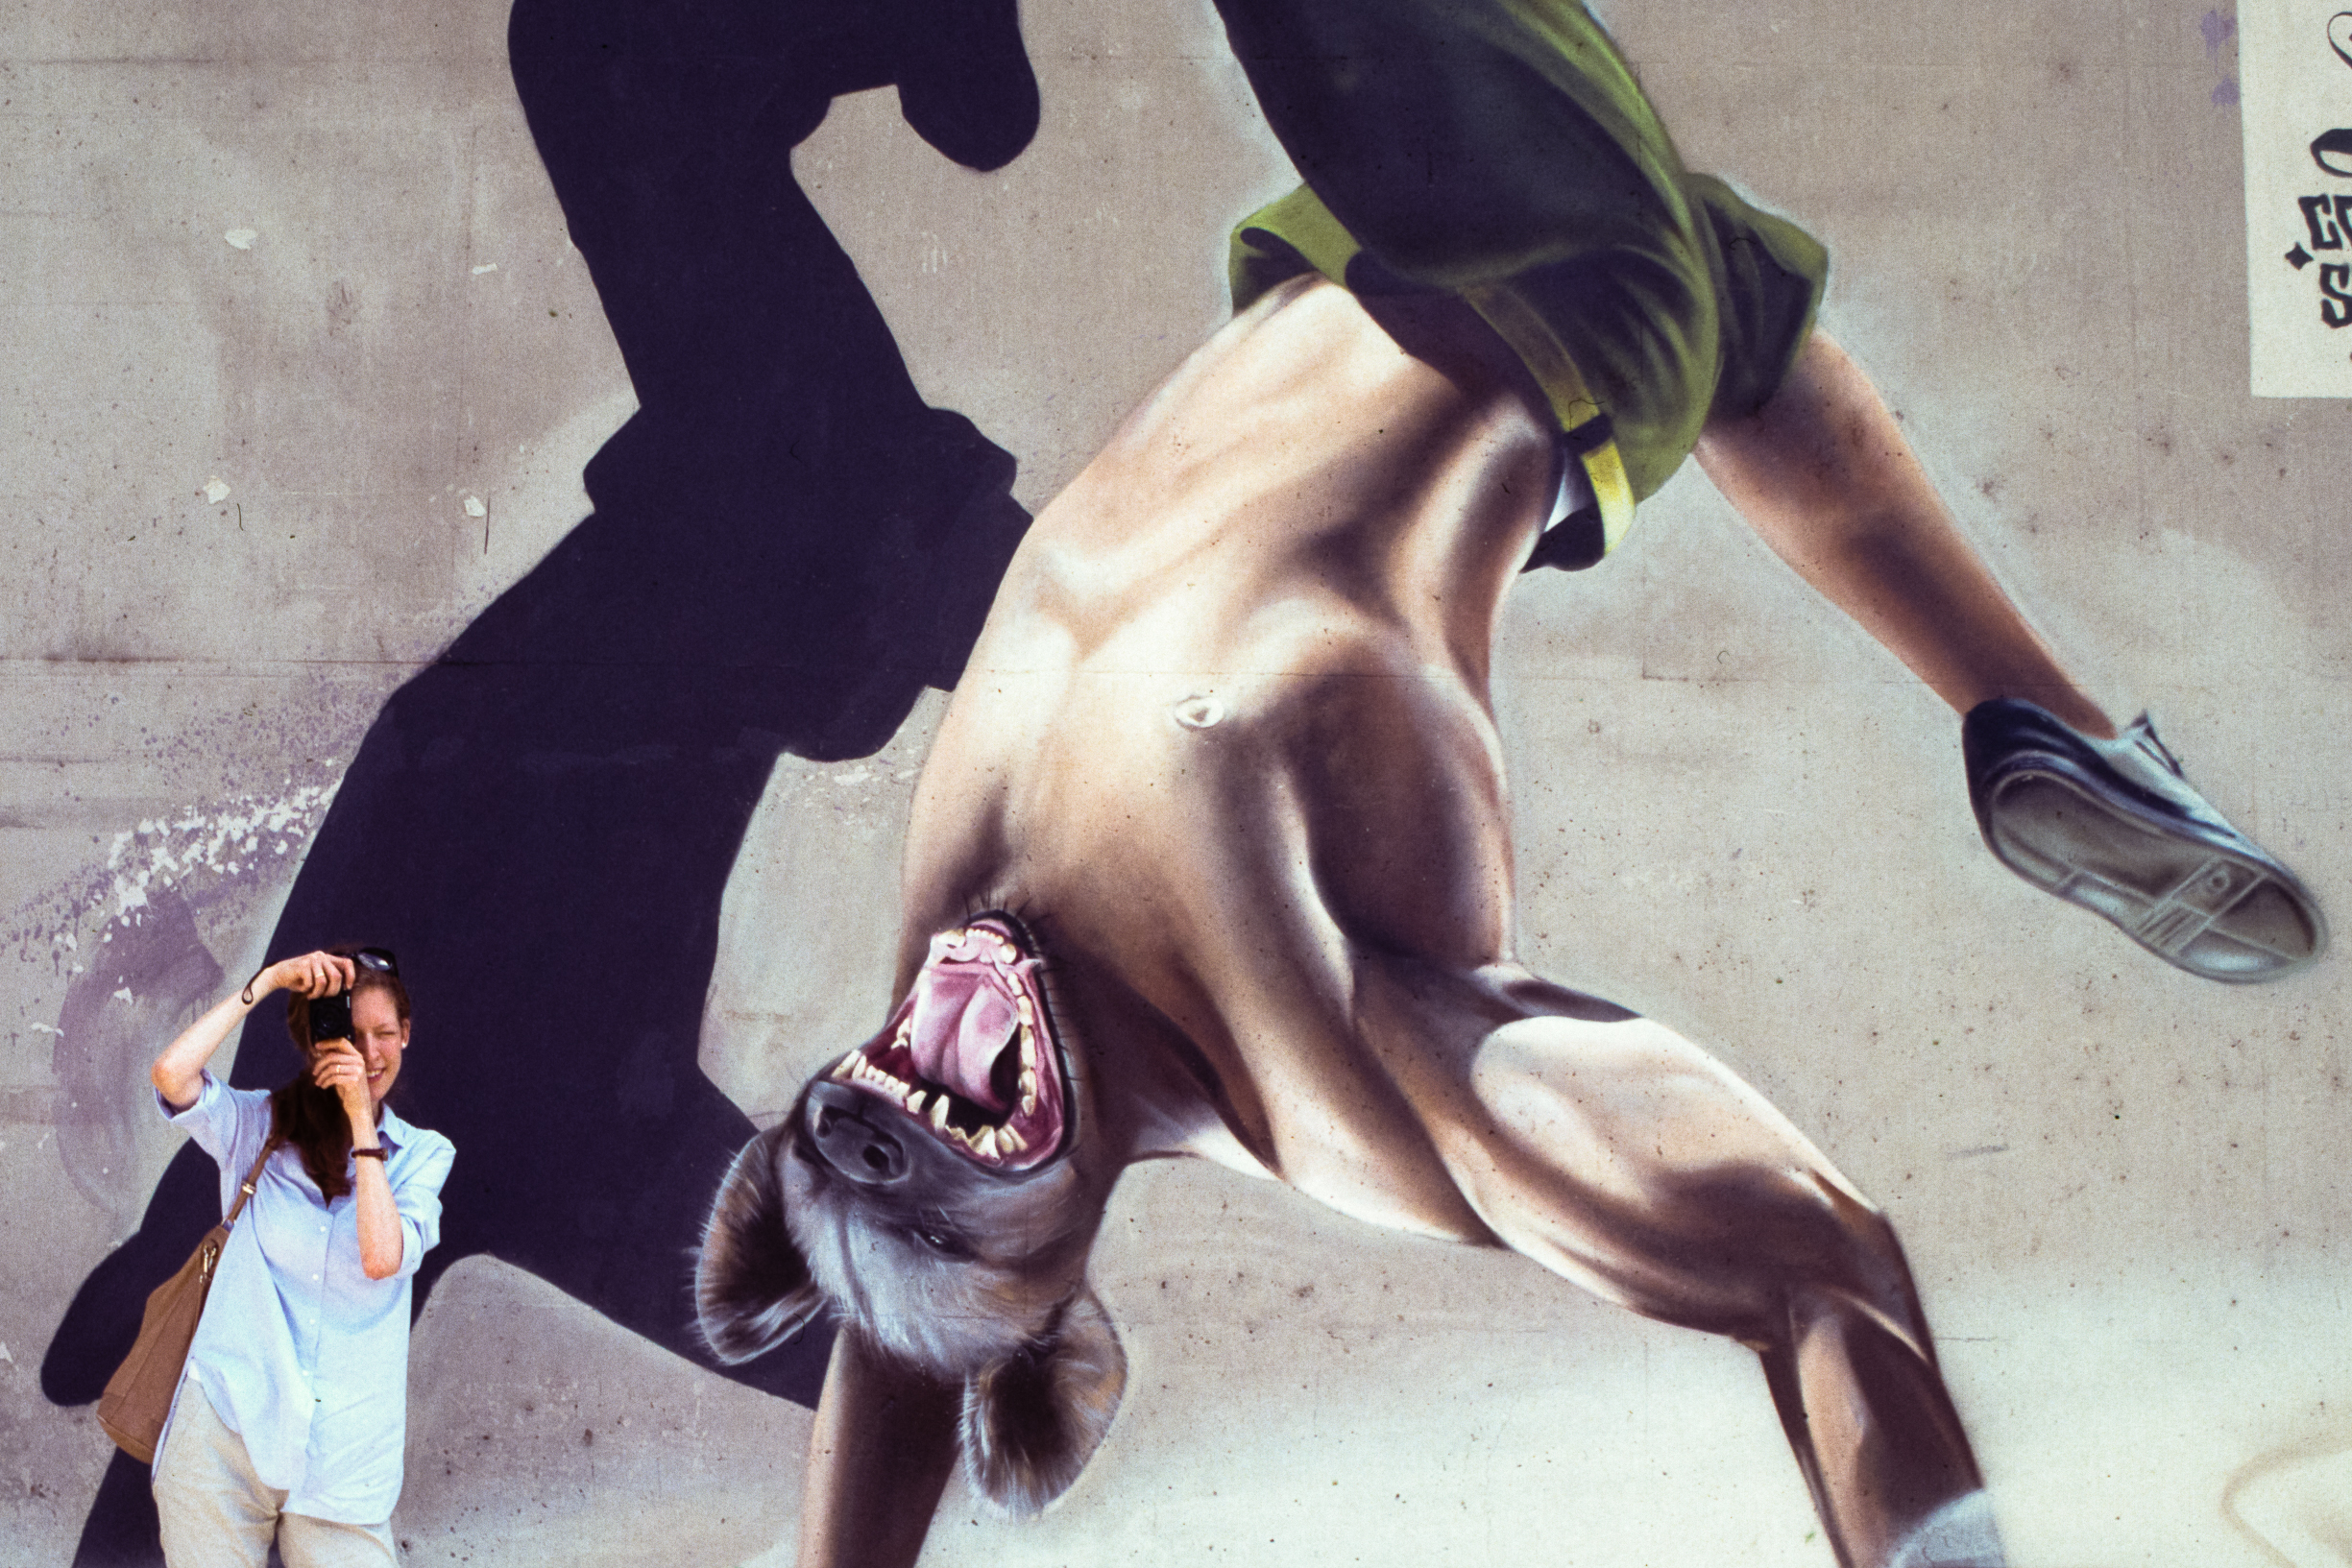
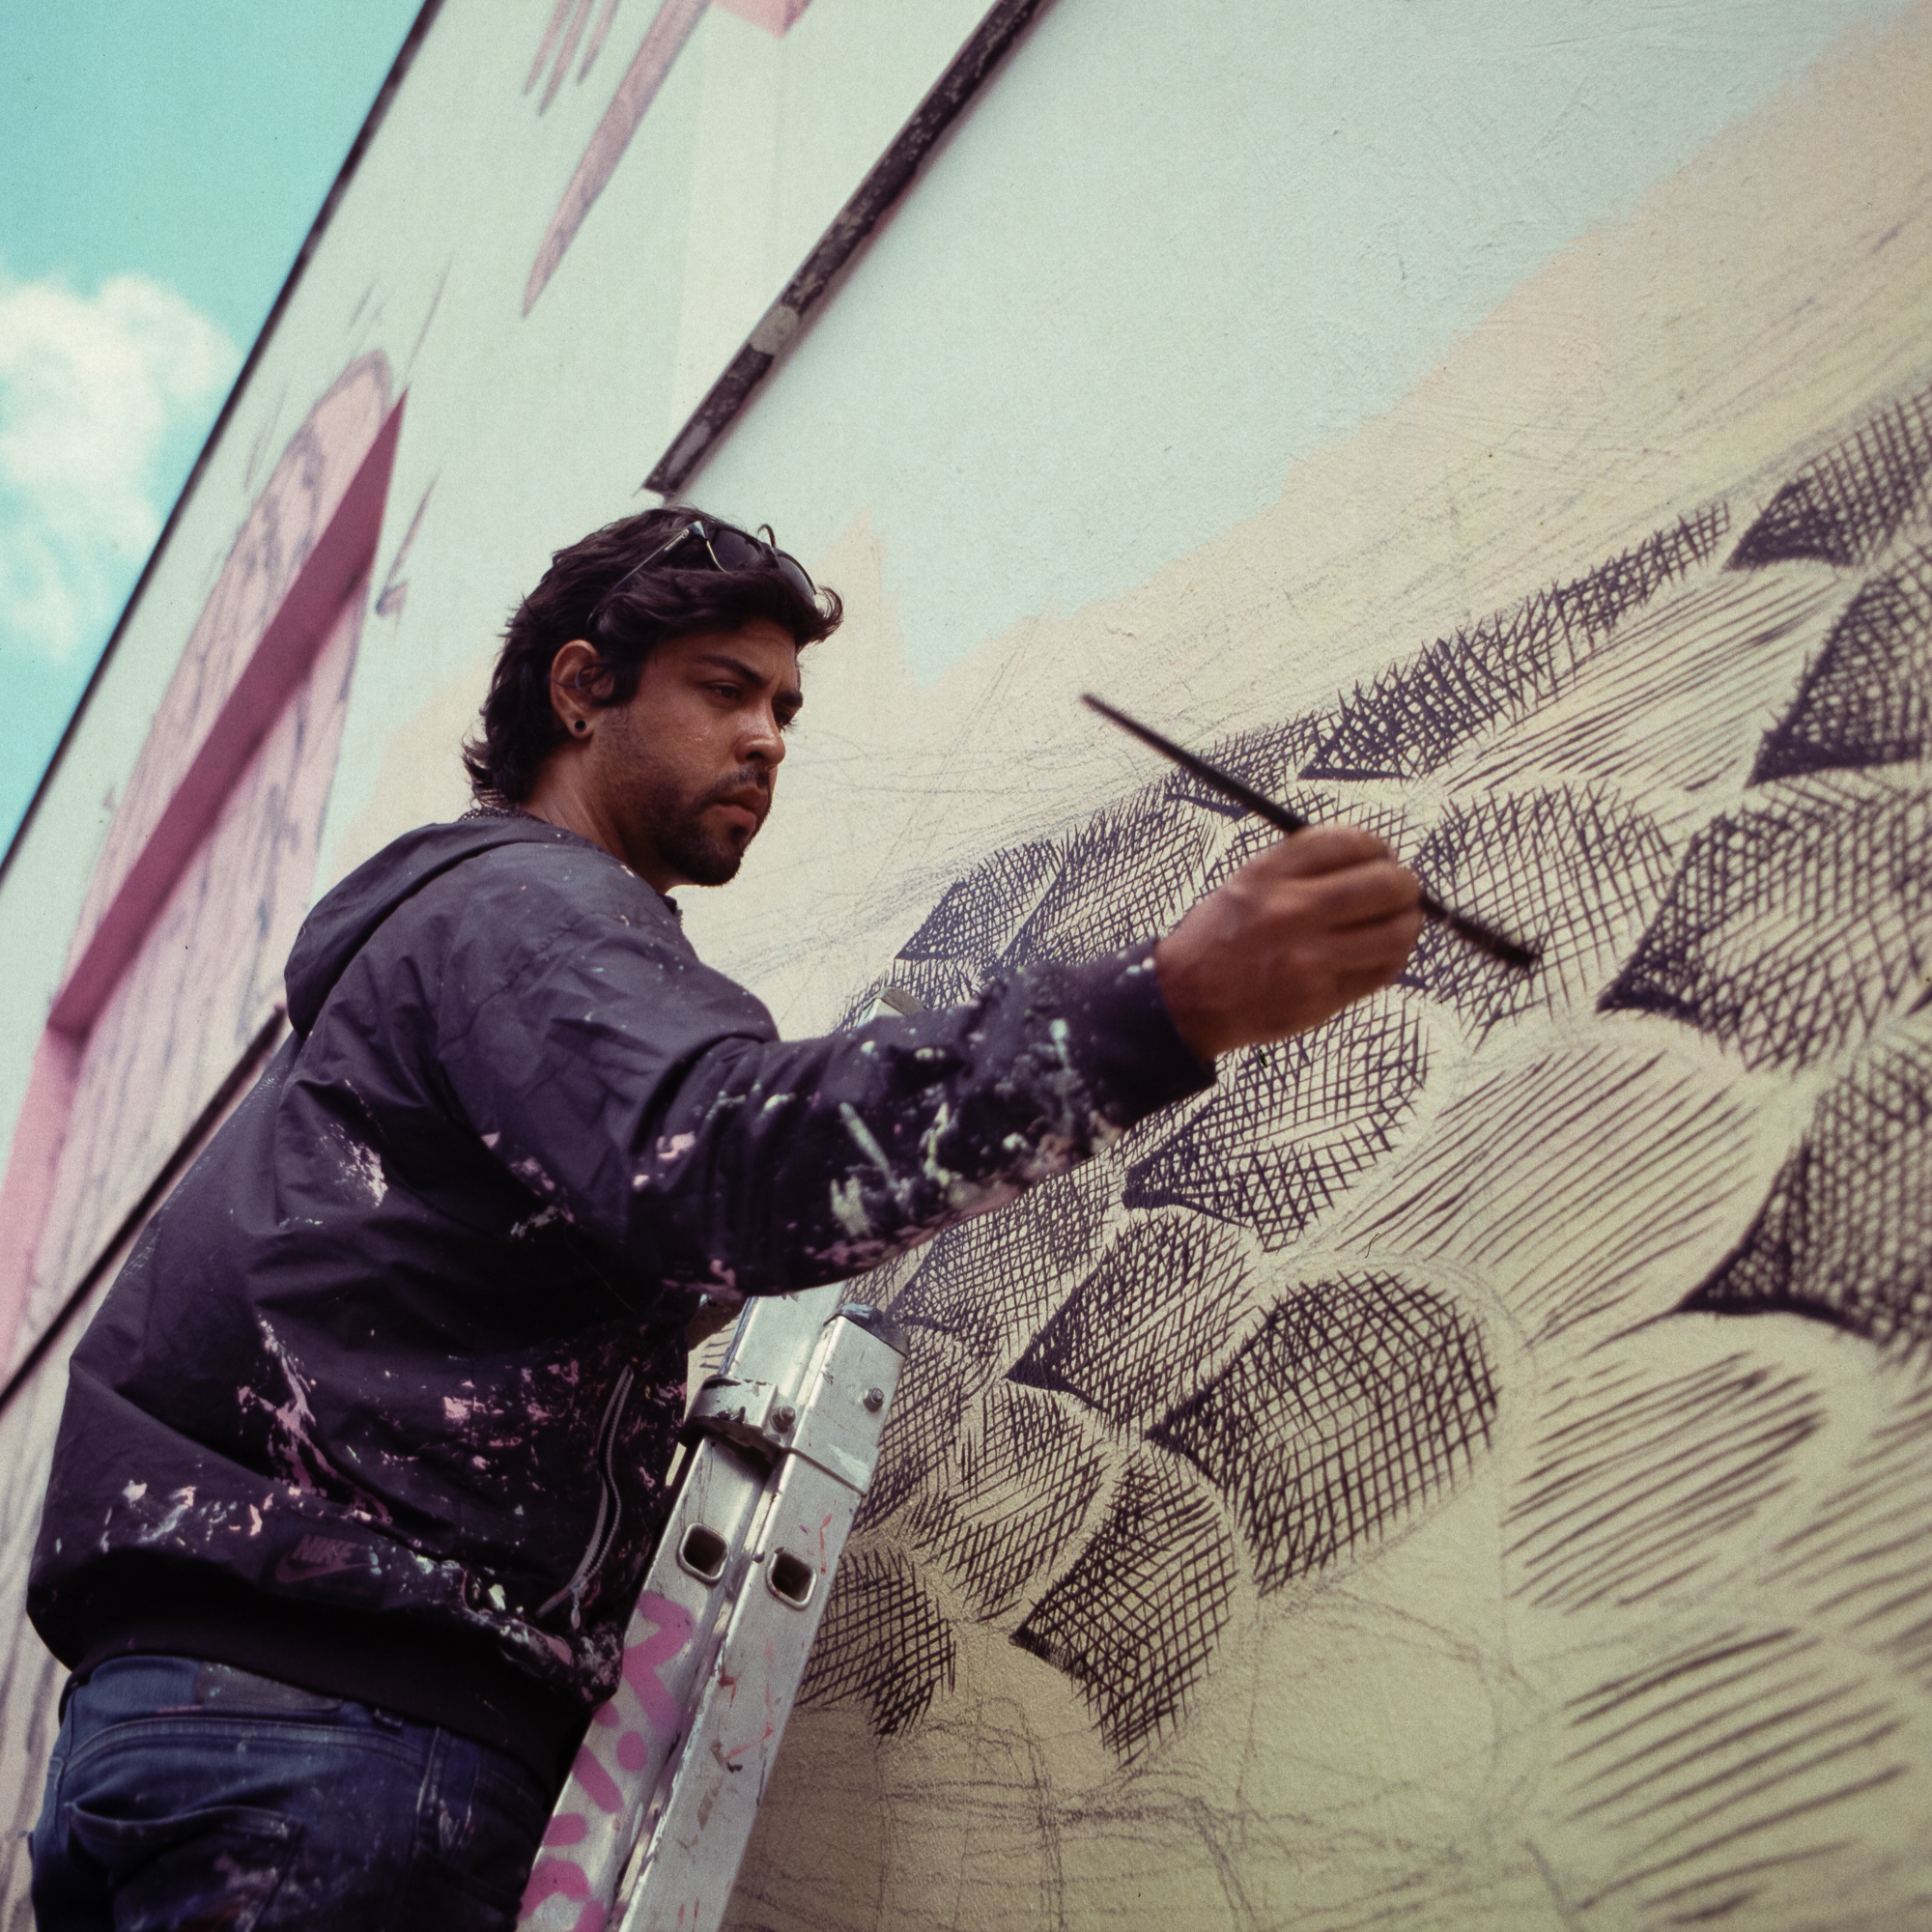
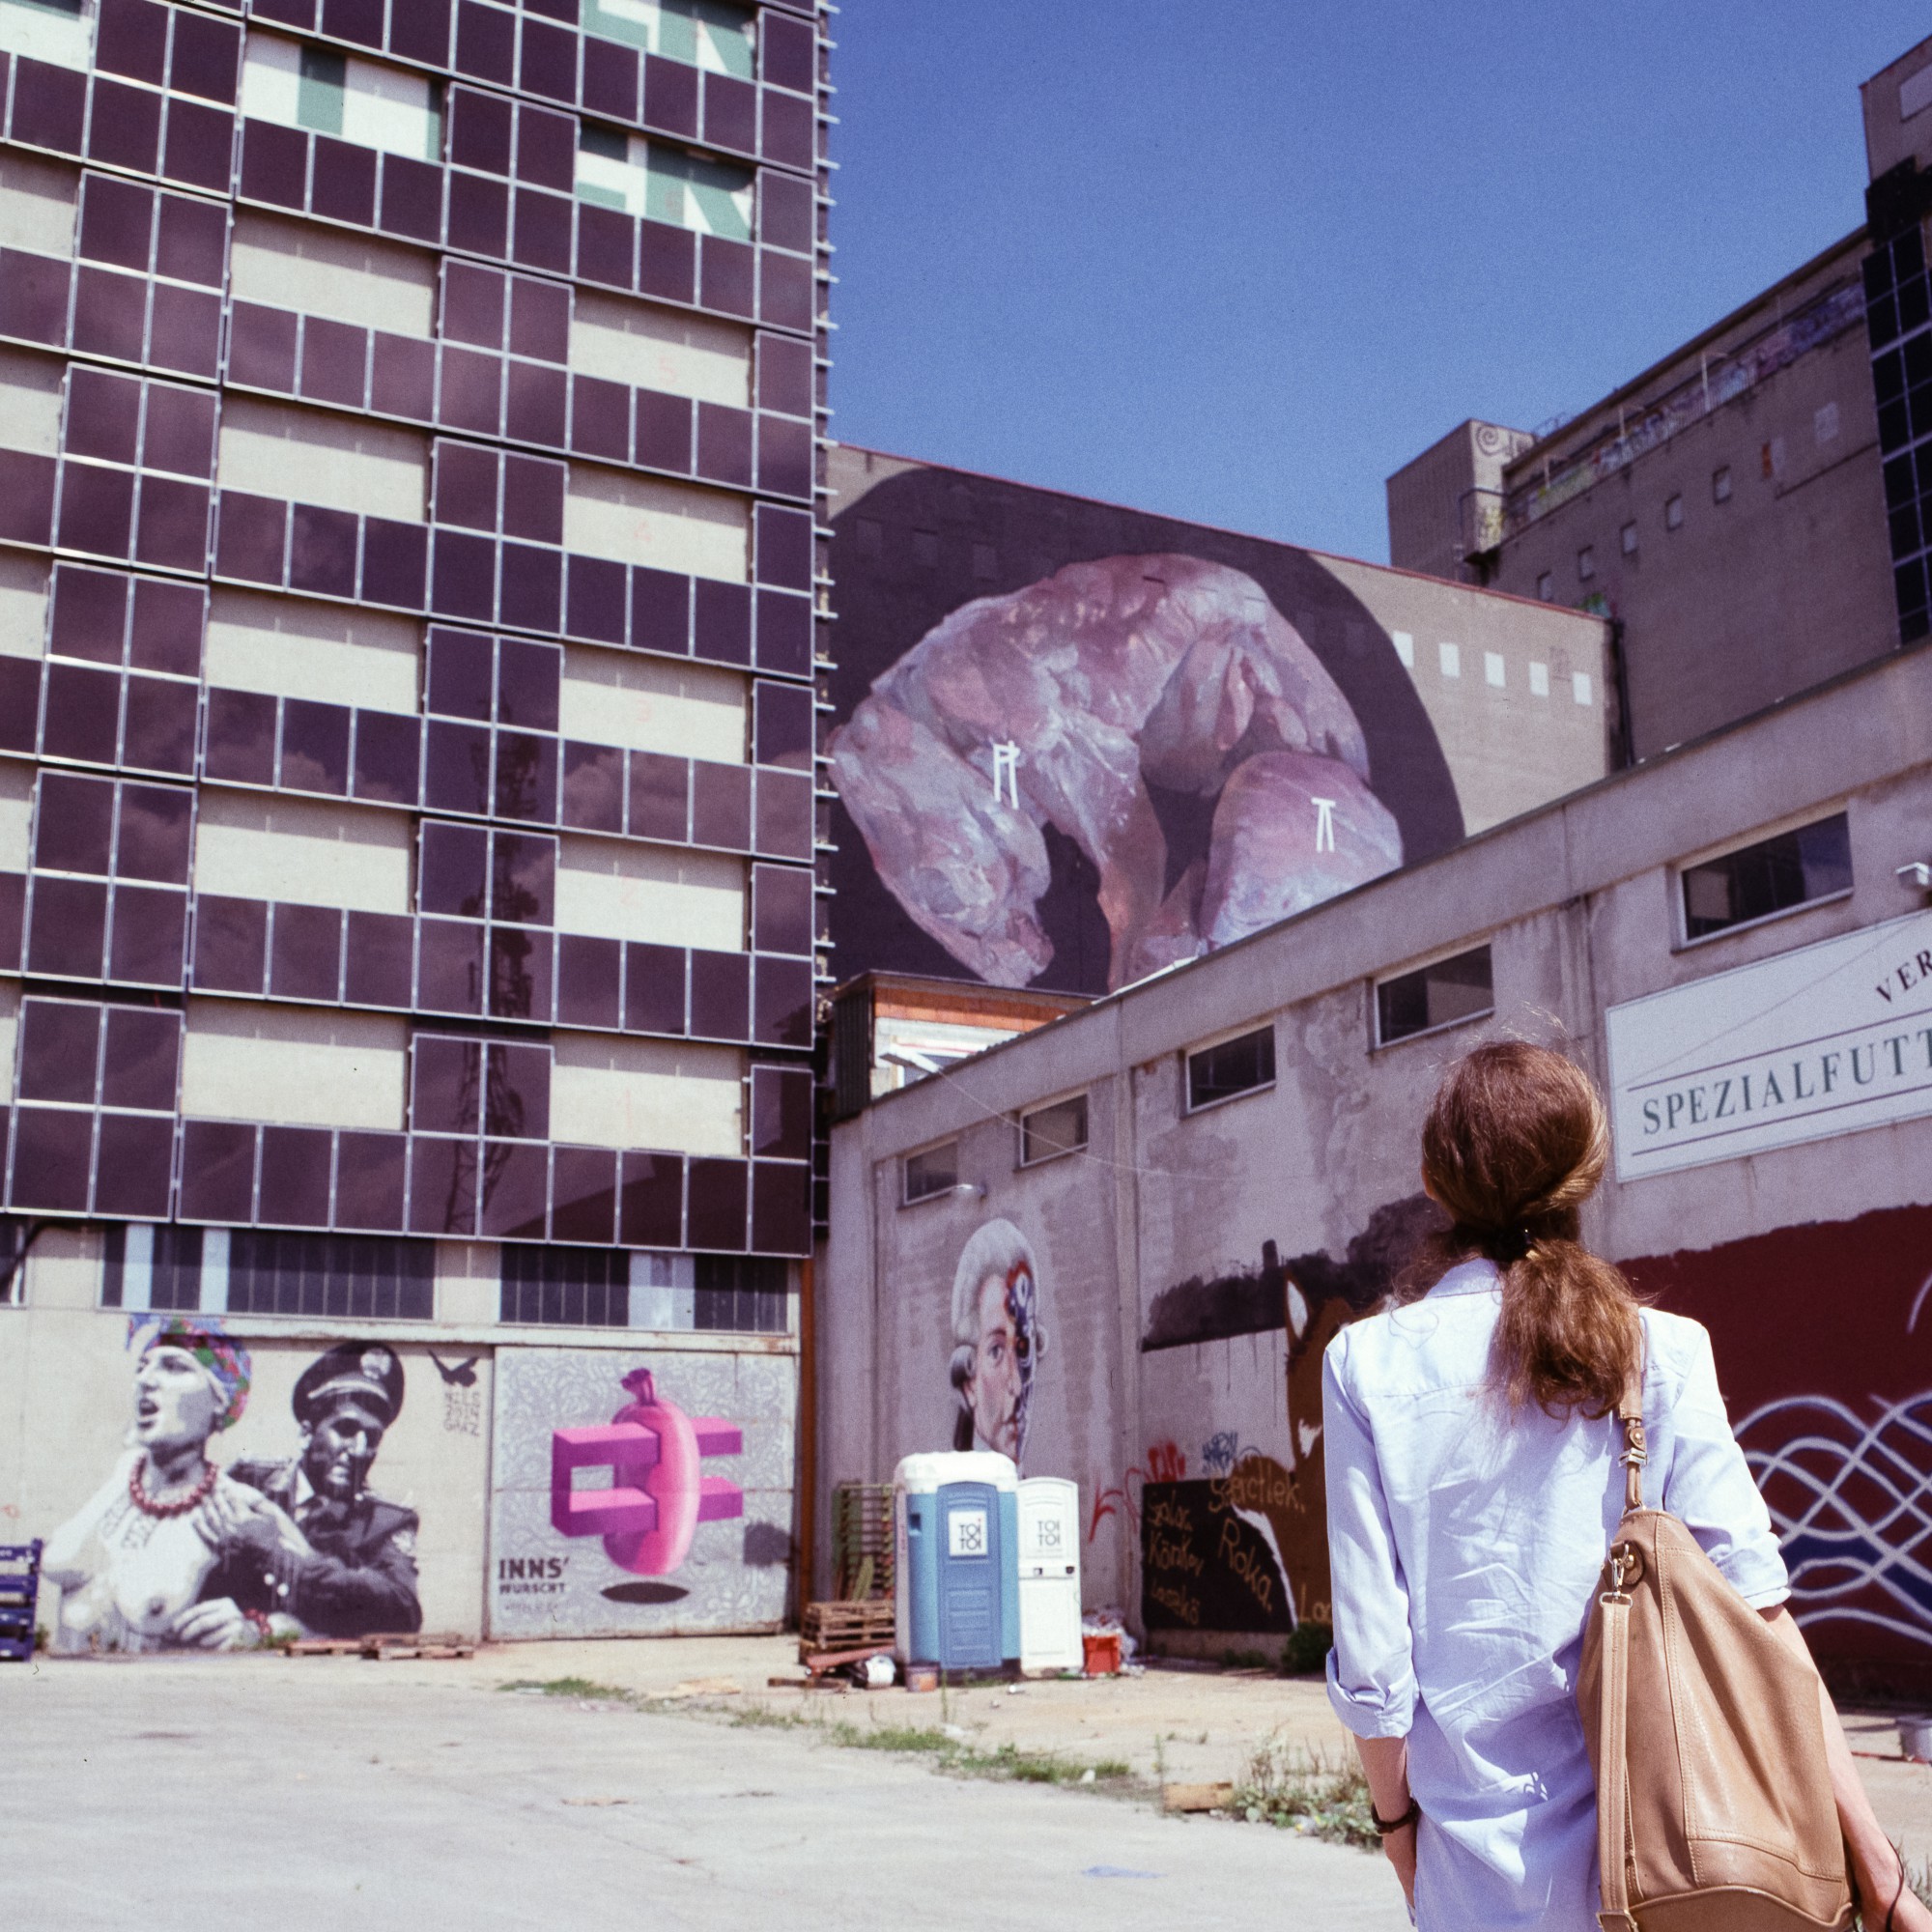
Walls are usually not the most exciting subjects to photograph. To use medium format slide film to do that is even more strange and could be considered as some sort of crime by some. After all, we live in a time when both film and labs which are able to develop slides are more and more scare.
But what if you’ve found some really awesome walls filled with stunning graffiti masterpieces varying in size up to 30 meters (my approximation) and the whole place is a partly abandoned industrial complex.
Well, I couldn’t resist and loaded my Pentacon Six with a roll of expired (in 2004) Kodak Ektachrome 64 and headed to this place with my wife to take pictures of walls. In fact, she took way better photos than me, so maybe I will post those in the future as well.
I usually have no problems with expired film stocks, but this roll of Ektachrome gave me a very interesting result. When it came back from development it was possibly the flattest looking positive I have ever seen. I thought that I majorly overexposed all the frames equally. Surprisingly after scanning, I had to realize that almost no highlights were blown away and I could recover many details and color information during post-processing. I have the impression that the last 10 years after the end of the expiry date of the film was not spent in a refrigerator. I still have 4 rolls of the same batch of film, I need to think it over if I want to give them a second try.
The place we found hosted the Livin’ Streets 2014 festival for urban art, graffiti & street art between 07.06-18.07 2014. Their facebook page is here. Although we were too late to see the actual event, we could still meet with one of the artists who stayed to finish his work and also we could see all the paintings in the finished form. It was a great experience and we had a lot of fun, so yes it is totally fine to shoot some walls from time to time.
The photos were taken by my Pentacon Six Tl using a Carl Zeiss Jena Flektagon 50mm and in some cases a Biometar 80mm. The film was developed by a local shop and scanned by me with a CanoScan 9900F.
Finally, the Sun has returned to us and days are once again long enough for me to have a chance to enjoy the light even after working hours.
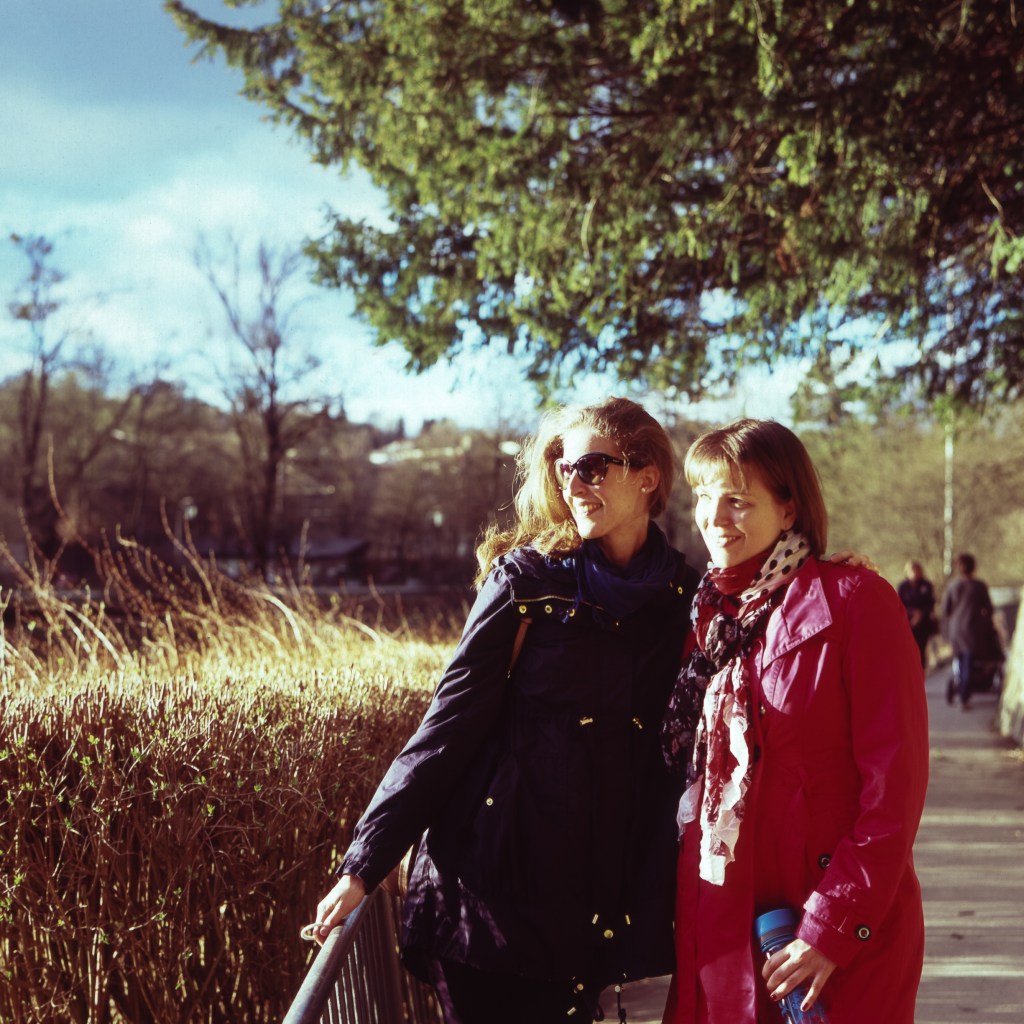
To celebrate this blessing I have finished shooting the roll of Velvia which I have started last October and now sharing with you. A mixture of my two favorite seasons, autumn and spring on the same roll in vivid colors. Isn’t it wonderful? I am truly being energized by the spring, and I hope you too. Go grab a camera and have at least as much fun taking photos as I do right now.
Hilmteich See ( Graz, Marc 2014), Pentacon Six TL, CZJ Biometar 80mm f/2.8, Fuji VelviaEszter & Anna (Hilmteich, Graz, Marc 2014), Pentacon Six TL, CZJ Biometar 80mm f/2.8, Fuji VelviaAnna (Graz, Marc 2014), Pentacon Six TL, CZJ Biometar 80mm f/2.8, Fuji VelviaEszter (Mariatrost , Graz, Oct 2013 ), Graz, Pentacon Six TL, CZJ Biometar 80mm f/2.8, Fuji VelviaEszter (Mariatrost, Graz, Oct 2013 ), Graz, Pentacon Six TL, CZJ Biometar 80mm f/2.8, Fuji Velvia(Hilmteich , Graz, Marc 2014), Pentacon Six TL, CZJ Biometar 80mm f/2.8, Fuji Velvia
Yet another quick post with little-written content but with a bunch of random snapshot images. This is what I end up with when I carry the same roll of film over weeks and only occasionally have a chance to shoot. I am basically on pilot light mode right now and really hope that the next year I can do something a bit more organized work. What I can book as an achievement though is that I could gather some courage and I asked a stranger for a portrait on a street again. It was a really nice experience and I am happy with the result, but you can judge yourself if you scroll down to the second photo.
This time I had my Olympus OM4 Ti in my bag in the last few weeks loaded with the same Ilford HP5 I used in the Kiev before. As usual, the film was developed and scanned by me.
A photographer is never really putting down his camera, no matter what crazy thing she or he is doing for a living or filling the days with. Since we are not living in an ideal world, most of us have to face the limitation of time and availability of light in our everyday life.
But limitations are not necessarily bad things! They teach us to utilize our possibilities more creatively by forcing us to see and think in ways we would normally not choose to. This, of course, influences our work as well as ourselves and vice-versa. Eventually this feedback loop can contribute our personal and photographic development similarly to the way the ever-changing environment influences life forms and pushing them towards evolution.
Currently, my job is to sit in an office and convince computers to obey to the needs of their human masters. Making their lives easier by sending them nice, well formed and most importantly correct invoices. As interesting as it sounds, but it is somewhat fulfilling to my geek side which likes to brain wrestler with abstract problems.
But it makes my photographer side starve because the current situation has a very little room for photography. Especially now when the winter is coming. Days are shorter and shorter, so more and more frequently I end up to spend most of the hours filled with natural light in between walls in my natural working environment.
To overcome this obvious contradiction, I decided to make occasionally a “bring your giant medium format camera to work day“. I started to bug my colleges and taking portraits of them during lunch brakes or when I need to wait for my computer to finish a long-lasting blocking task.
The point is, you don’t need to stop being a photographer, just because the conditions are not ideal for the kind of photography you are normally up to. Try to get out the most of the situation and who knows this might drive you to completely unforeseen paths and discoveries.
Jogi, Pentacon Six TL, Carl Zeiss Jena Biometar 80mm, Fuji Across 100, Kodak D76, Canoscan 9900F
Jogi is a musician besides being a software engineer and in my opinion, they are making pretty cool music. Their website http://www.theflamingdugongs.at/ is not complete yet, but worth to have a look at.
Barbara, Pentacon Six TL, Carl Zeiss Jena Biometar 80mm, Fuji Across 100, Kodak D76, Canoscan 9900FJanez, Pentacon Six TL, Carl Zeiss Jena Biometar 120mm, Fuji Across 100, Kodak D76, Canoscan 9900FKyrylo, Pentacon Six TL, Carl Zeiss Jena Biometar 120mm, Fuji Across 100, Kodak D76, Canoscan 9900F
Kyrylo was so pleased with his portrait that he visited me at my desk (2 floors below his place) to shake my hands right after I sent it to him.
Hannes, Pentacon Six TL, Carl Zeiss Jena Biometar 80mm, Fuji Across 100, Kodak D76, Canoscan 9900FMarco, Pentacon Six TL, Carl Zeiss Jena Biometar 80mm, Ilford HP5, Kodak D76, Canoscan 9900F
Naturally, it is not my top priority to photograph at work, and I always make sure that this does not have any effect on my everyday responsibilities. It took me quite a while (about 2 months) to get these images. Though they are not perfect, I enjoyed taking them they are part of my journey.
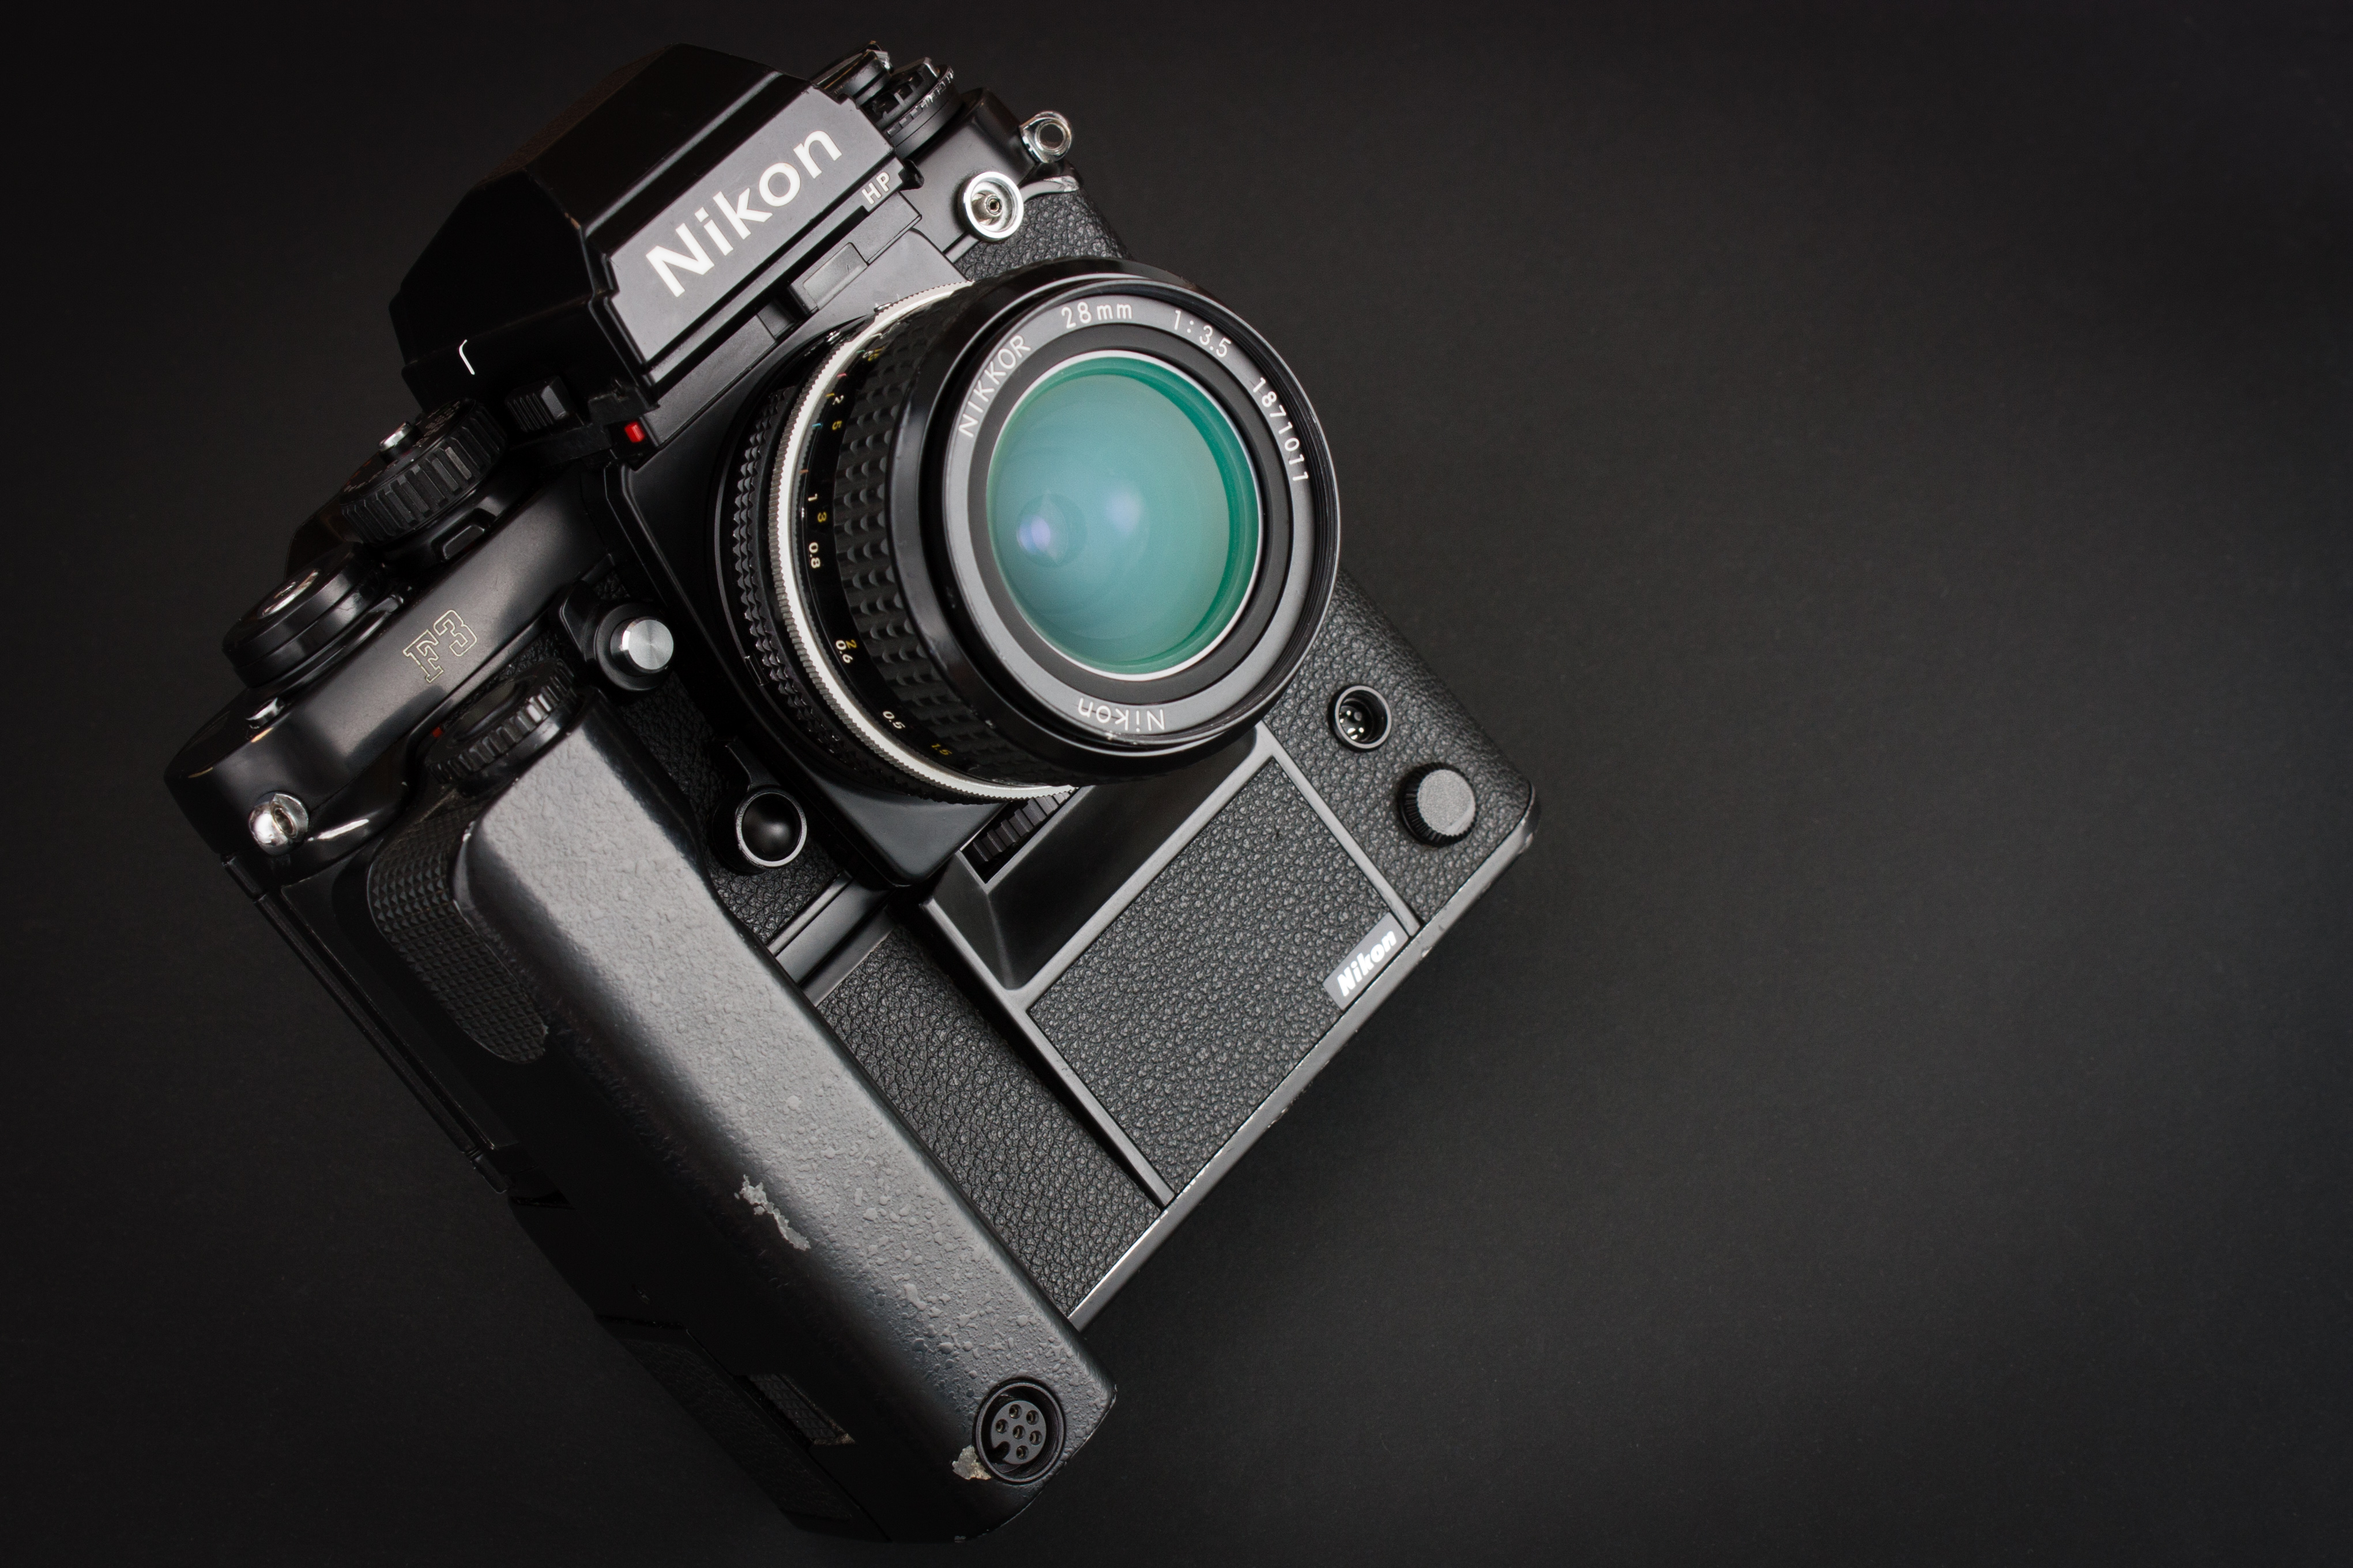
This classic camera was undoubtedly one of the biggest and most dividing celebrity of the 80’s. At least among professional 35mm SLR cameras of course. It created quite significant waves in the world of professional photography because with it Nikon finally put the vote on automation and electronics as the new lead design principles.
Nikon and me
I am not dedicated to any brands, so there is no particular reason why I haven’t wrote about any Nikons until now. In fact my very first camera was a digital Nikon Coolpix 3500. It was hideous to use and broke horribly, but still it was my very first camera.Not much later I owned for a short time a Nikon F75 which was the first and until now the only camera which I’ve ever sold. It was a great tool, but it had a monstrous hunger for not so cheap CR2 batteries and it was way too modern for me anyway. The little Coolpix is still lying around somewhere in a box with serious electronic injuries. Who knows just like any other (now classic) camera, maybe one day it will get repaired too.
By the time it was very hard to accept these changes by the majority of professionals who simply did not trust anything which was depending on batteries more than a powering of a light-meter. It is a bit hard to imagine today but at that time it had a perfect sense. But the change was already on the doorstep and it was inevitable. The previous F models were already masterpieces mechanically anyway, there was very little room for possible improvements in the purely mechanical realm.
The F3 was their first electronically controlled single digits F camera and despite of the early resistance by the community, it found the way to tremendous success and changed the face of the camera market once and for all.
In fact what Nikon did with this camera was nothing really revolutionary or unexpected as all the technology was already existed and tested by lower-end models of theirs or by the competitors. They simply selected the best components available and remixed them in a very attractive package.
I could write a lot more about the exciting history of this camera, but there are other more competent people who just did it very well before of me. So instead of a week attempt of a complete and deep introduction of this camera, I simply try to give an overview filtered through my own experience.
I can faithfully recommend this site for the historical overview and for all possible technical details.
Nikon F3 HP official structural illustration
How did I get this camera
Nowadays my collector nature is being held a back because of the lack of time and dozens of higher priority projects. This is not necessarily a bad thing, sooner or later I need to settle and start to master the gear I already have. The negative side-effect is that I am running out of (new) old cameras to review. But fortunately it turned out that I can try out and write about a camera without actually owning it. I have a good friend who has a grandfather with a really good taste and since he moved to digital he gave his old Nikon gear to his grandchild. At first I just spot a box of T-max on the shelf at the place of Andrea’s and I asked her in which camera she intend to use it. Eventually she showed me a really nice bag full with vintage gear including the F3 with motor drive, many great lenses, matching flash unit and many more gems. Few weeks later (when I have recovered the shock, found my jaw and gathered enough courage) I asked her if I could try out the gear. She said yes, so the post you are reading now couldn’t be written without her kindness.
Data sheet
Type TTL auto-exposure 35 mm. Single Lens Reflex Camera.
Produced 1980-2001
Film type 24mm x 36mm
Weight 780g (body without lens, but with HP prism, batteries and film loaded)
Dimensions (HP version) 148.5 x mm height, 101.5 mm width, 69 mm depth
Shutter speeds 8s-1/2000s, B, Aperture priority, 1/60s can be used mechanically without batteries
Sync speed 1/80s
Viewfinder various interchangeable finders
Exposure meter full-aperture TTL centre-weighted exposure measurement at (80/20)
Batteries Two 1.5V silver-oxide batteries SR44 (Eveready EPX-76) or alkaline manganese batteries LR44
Self-timer 10s delay electronic self-timer
Hot shoe special accessory shoe on the rewind knob supporting TTL flash units; PC synchro socket.
Motor drive optional MD4 motor drive up to 5.5 frames per second with mirror lock-up
Mirror lock-up
Depth of field preview
AE-lock
Multiple exposure lever
Exposure compensation
First and second impressions
When I first had a closer look, I was not exactly impressed. The camera was bit dusty and showed marks of very extensive use. Nothing serious, but I really had the impression that the camera may had some mechanical issues. Nevertheless I took my time, and cleaned the dust and smudges carefully. During the process I had to realize two very important things. First of all never give up on an F3, these cameras are very hard to kill, no matter how they look like there probably nothing wrong inside. Second of all it has many buttons and switches which I had no idea what are they good for. I have seen many unusual designs like left handed Exactas and other marvels, but the F3 control layout gave us some rounds with Google and the user manual.
Nikon F3 with MD-4 motor drive, Nikkor 28mm f/3,5 and HP prism.
I also cleaned the lenses belonging to the F3 and since they were protected with filters all of them were in an excellent condition. They feel a bit dry to me in terms of lubrication, but otherwise focusing very smoothly and precisely. Maybe they act completely normally, only I am not so familiar with Nikon AIS lenses.
After I finished the cleaning of the gear and finally powered up the camera, the moments I spent with trying out every part of it lead me to the conclusion. You can trust this camera. The more I use it, the more I trust. The sound of the shutter, the feel of the advance lever, the snappiness of the motor drive all ensure this feeling. After all this image what a professional camera should show about itself.
Things I love about the F3
As I said the Internet is loaded with much more established articles about the Nikon F3, therefore the very best I can do is to share my personal opinion about it. Let’s start with the things I most appreciate in this camera.
Look and feel
Nikon F3 in leather half case with Nikkor 105mm f/2.5 and HP prism.
The F3 is an important milestone in the history of Nikon, but not only because of the technological aspects. This was the first Nikon which appearance was designed by the Italian designer Giorgetto Giugiaro. He introduced the red mark on the grip, which is an unmistakable characteristics of every Nikon SLRs since then. Indeed, this camera looks different from every previous models and can be distinguished with ease from the competitors as well.
Personally, I like the previous F shapes better, but I have to admit that the F3 looks all right and it also handles great at the same time. The small grip contributes to the secure holding, and I find it very clever how it fits together with the motor-drive.
Butter smooth operation (excellent mechanics)
Every part of the camera carries the marks of mechanical excellence. Even the smallest moving piece is doing its job with minimal resistance and completely free from any inappropriate noise.
There is virtually no difference in the operation of the film advance lever with and without film loaded into the camera. It is really that smooth that you can have a hard time to say that the camera loaded.
The mirror flips up quietly and gently as well, it produces very little camera shake compare to my other SLR cameras.
Viewfinder experience
For me one of the most important aspect in a camera is the viewfinder experience, and this is where the Nikon F3 really shines.
First and foremost this camera features a modular design, which allows you to choose from a huge variety of focusing screens and finders. This particular kit came with a HP prism and with my all times favorite waist level finder.
Nikon F3 in leather half case with Nikkor 50mm f/1,4 and HP prism. Waist level finder next to it.
The HP abbreviation stands for High eye Point which provides a proper picture in the finder from the viewing distance up to 2,5 cm. This is especially beneficial for those who wear glasses, having larger than average nose or don’t want to squeeze their eyeball into the finder window. Although I don’t wear glasses, I still find convenient to use this finder too. The downside is that the image is slightly smaller than the one found in the usual prism. The finder window is round shaped, which looks very nice and professional in my opinion . The prism also features a window-blind to prevent light entering and thus altering metering results when shooting on a tripod.
I mentioned that waist level finders are very close to me, I have got used to the work with them with my Pentacon Six. Due to the lack of any additional optical elements (prism, mirrors), this finder gives the brightest and crispest image possible which indeed looks marvelous when using the F3.
Viewfinder mock
But the best part of this camera is the way it indicates shooting parameters in within the finder.
A small LCD display shows the shutter speed settings, while the actual aperture marking (from the lens itself) is projected into the finder. In other words, you really see your lens marking in the viewfinder. I simply cannot imagine any cooler solution for this problem.
These information windows are built into the body, therefore all compatible finders benefit from them. The same information can be read in the HP prism and in the waist level finder.
Light metering
But how is the light metering done? Traditionally the metering cell/s are located in the prism. Obviously it cannot be the case with the waist level finder, besides all readings are passed from the body to the finders.
In case of the of the Nikon F3, the metering cell is located in the body to support the interchangeable viewfinder design. The cell is located at the bottom of the mirror box facing backwards to the direction of the film. There is a small secondary mirror underneath the main mirror in order to transfer the light for metering. The main mirror is semi transparent at the middle thus the secondary mirror can reflect part of the light to the metering cell. The secondary mirror moves synchronously with the main mirror.
This layout has another benefit of being capable to measure the light reflected back from the very surface of the film being exposed. This way real time exposure control is possible which is essential with TTL flash photography.
1/80s before the first frame
Have you ever tried to load a semi automatic camera with the lens cap on? I committed this mistake quite a few times with my Olymous OM 4. Normally, because the lens cap is on, the camera calculates a very long exposure time so you need to wait a lot before you could get to the next frame. This could be really annoying especially when you are in hurry. Of course, if you set your camera to manual mode during loading, this is not an issue at all, but somehow I walk into this trap quite often.
It seems that the engineers of Nikon knew my kind and built in a mechanism which sets the shutter speed to 1/80s until the frame counter reaches the 0 marking. This prevents me to fire a 30s exposure during film loading.
This can be a disadvantage to those who tries to get the maximum amount of frames out of every roll, but personally I think it is a really nice and clever feature.
Small touches everywhere
The Devil is in the details. If you take a closer look on this camera, you can notice a numerous fine details which aren’t that necessary to operate the camera, but contribute to the overall feeling. They make you feel confident that the camera you are holding is a very special and fine tool.
Some of the little details are not unique to this particular model, but characteristics of the Nikons at this era. For example I like the screw cap of the battery compartment. It has a small plastic holder, which positions the batteries and it has a clear graphical indication, how the batteries should be placed.
There is a lock on literally everything which can be accidentally moved such as shutter speed dial, film rewind, exposure compensation and mechanical shutter release. There is no way, you accidently change a setting or open the camera.
Ever-ready case is the best I have seen apart from 3rd party manufacturers. It can be used as a half case, it lets you see the film notes at the back and it is very stylish.
The window blind on the prism, the mechanical shutter release, the way they implemented multiple exposure control are all very fine details.
Things I don’t like so much
Actually it is very hard to find anything to not to like on this camera, but I have managed to put together a short list.
Weird switches
Nikon F3 weird switches (Can you spot the self-timer? it is actually around the shutter speed dial)
Probably because the F3 is a completely new breed of industrial design among Nikon cameras, they had to make compromises here and there. Some switches such as self-timer and the on-off switch are a bit small and less intuitive to use. It took me some time to figure out what is the self-timer switch is doing. But the weirdest button of all is the little red rectangle just below the finder. This is used to illuminate the shutter speed information screen in the finder. It is hard to find and even harder to press during composing a frame. You need to use one of your fingernails to be able to push it.
Hot shoe
Because of the interchangeable viewfinder design, the hot-shoe could not be placed at the top of the prism, therefore and alternative solution was needed. The Nikon F3 has a very interesting non standard flash shoe combined with the film-rewind lever. This part of the camera gives home to the film speed settings and exposure compensation. To use flash, you need a special flash or an adapter.
Test shoots and answer to the scanner crisis
I have asked specifically the guys at my favorite camera shop and photo lab to scan my negatives without over-compressing the resulting jpg files. But they managed to give me once again 50% compressed garbage, therefore I officially gave up on them and decided to give another shoot to my old scanner. This time however, I tried out SilverFast (again) instead of the factory software I used and finally I have found the common understanding with this software. It really gave a new life to the old scanner of mine. I love the possibility to reduce noise by multiple scanning. I still think that this is not the final solution for my scanning crisis, but for the time being it is an acceptable compromise.
Click on the photos for full resolution versions so you can really see the quality of the scans! If you feel like, I would be happy to read your opinion in the comments section about the quality of these shoots and of course about the photos themself.
I know that this is not a fair comparison since the OM4 was released a few years later, yet both cameras represents the top of the manual focus models in their respective brands. Both of them shares the formula of manual focus, electronically controlled horizontally travelling shutter with mechanical back-up, aperture priority auto exposure, somewhat similar light metering system with TTL flash control and separate motor drive. It would be better to compare the titanium versions, but at the moment I have my hands only on the normal F3.
Obviously the OM4 Ti feels more solid despite its lighter weight. It is smaller and you really can feel that this is a weather sealed titanium body. The F3 feels also solid in my hands, but not the same. I prefer my OM 4 Ti when it comes to build quality. Again the F3 titanium would probably compare differently.
The multi-spot light metering system of the OM 4 is also superior to the F3, although I had no issues so far with the Nikon even when using flash. On paper though the Olympus offers more in this aspect. It has to be said that the OM 4 is a newer camera, therefore this comparison is not entirely fair neither.
Olympus OM 4 Ti vs Nikon F3
The viewfinder experience is better on the Nikon due to the fact that not only the shutter speed, but the aperture values are shown in the finder. However the OM4 warns you right in the in the viewfinder when exposure compensation is active while the Nikon shows nothing. Both cameras can benefit from a wide variety of focusing screens, but of course the Nikon has the possibility to change the whole finder.
In terms of electronics, I feel more confident with the Nikon, somehow it feels as a more bulletproof system to me. The clever solution of fix 1/80s for the first shoots before the 0 frame and the very long battery life all gives me a good feeling. The Olympus has a very mature system, but I had some troubles with week batteries and the battery life is also less.
At the end both cameras are excellent choices and I think both can do the job equally well. The F3 offers more features such as mirror lock-up, multiple exposure, interchangeable finders, high eye-point prism, but the OM 4 is smaller, features a very unique and excellent light metering and flash system and has a rather classical look.
But no camera worth anything without compatible lenses. I think that the OM lineup is strong enough, but Nikon is definitely has a serious advantage here. So if you are about to choose between these 2 cameras or similar models, consider your lens needs first.
I own the OM4 and I will need to give back the F3 soon, and while I really enjoyed the time with the Nikon, I still appreciate the Olympus look so my camera-bag remains intact.
Conclusion and recommendation
If you would like modern, but manual focus camera which you can trust with no compromise in features and don’t mind the size, than this is the camera for you. I think the F3 is affordable today and you can use a really impressive set of affordable quality lenses as well. The motor drive is not my thing, but indeed it can make this camera a speed daemon (~5 fps) as long as you can handle the focus. TTL flash photography is also among the features, but keep in mind that you need a special adapter or a compatible unit.
I really like this camera, it is a pleasure to use, it does look stylish and it has the coolest aperture indication in viewfinder ever. So if you like it, grab one in good conditions and you will not need another camera for a long time because this oe will never let you down.
Sultan İkinci Beyazıd Veli Türbesi (Istanbul, Turkey) Pentacon Six TL, Carl Zeiss Jena Flektogon 50mm f/4, Fujicolor Pro 160NC, Canoscan 9900F
Finally, I am back with a post again! It has been a long time I could write anything. The reason for this long break is that I have got married plus I have changed job and country to live. From September I will live in Austria and I hope I will find new impulses for my photography.
Anyway, thanks to my old mentor and friend PepLluis that we could visit a really extraordinary place (Istanbul) as our honeymoon. This post is a kind of diary about this trip taken by my beloved Pentacon Six TL camera. Although we have carried a digital camera as well the medium format is one of my weak points and so I decided to share these images over the digital.
Pentacon Six as a travel camera
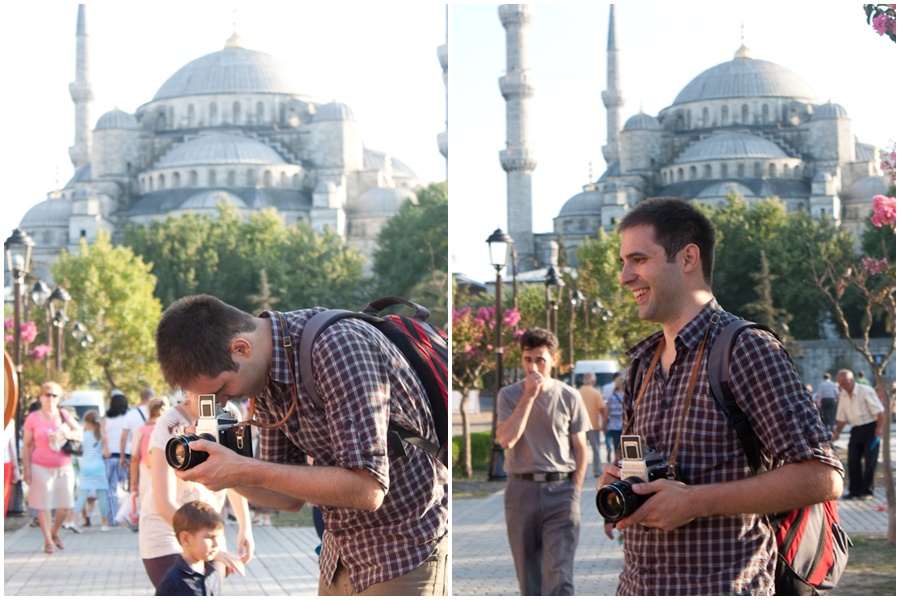
Of course, a big question has immediately emerged when we hit the warm and crowded streets of Istanbul with a heavy duty medium format camera and with three lenses and a tripod in the backpack. As you would suggest this gear is anything but light, so the question is how good travel camera is the Pentacon Six TL especially nowadays when you can choose among many excellent lightweight digital system cameras.
This gear is indeed heavy and cumbersome to use. You need to measure light in advance, focus carefully (the depth of field is really shallow on greater apertures) and you must hold the camera very still when firing the shutter. These tasks can be difficult in the crowd you can experience in the touristic places of Istanbul during Ramadan. I definitely gained some muscles after this trip.
On the other hand, the experience of operating such a beast is really unique as well as the results you can get at home. Personally, I am really pleased with the images and it was a great fun to use the P6. But next time I will think my camera choice over before packing. Nevertheless, I am pretty sure that the Pentagon will come with me many more times. My Pentacon Six TL review can be seen here.
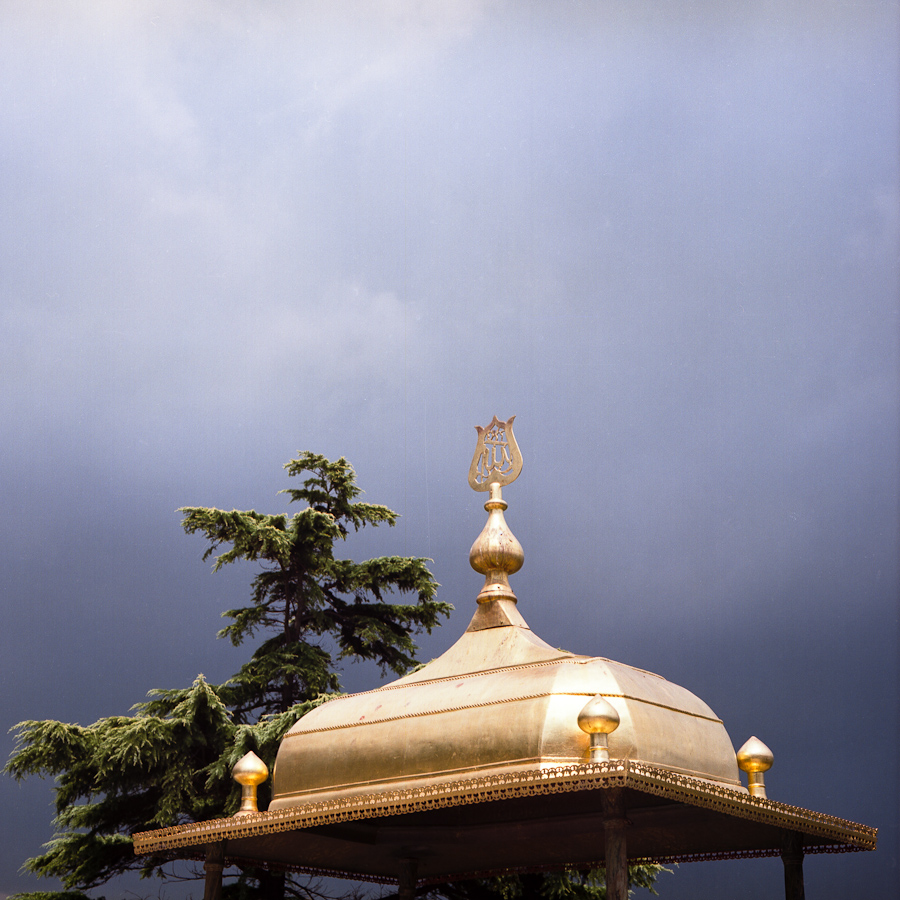
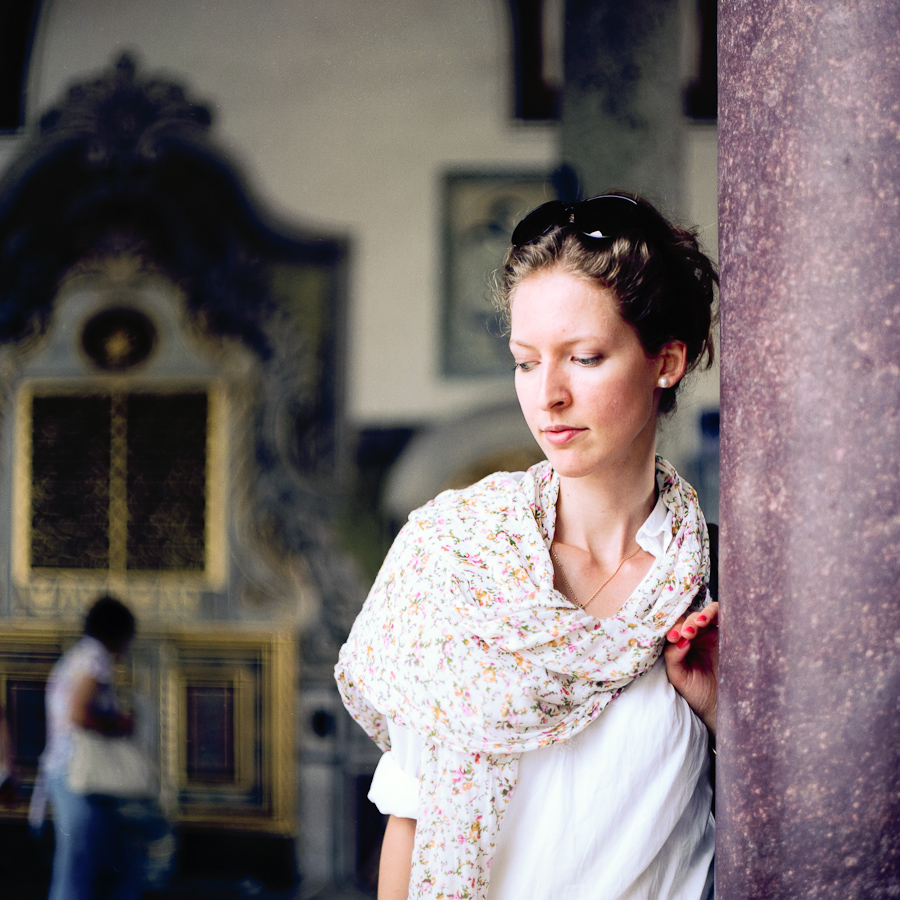
Approaching storm (Topkapi palace, Istanbul, Turkey) Pentacon Six TL, Carl Zeiss Jena Biometar 80mm f/2.8, Fujicolor Pro 160NC, Canoscan 9900FWoman (Topkapi palace, Istanbul, Turkey) Pentacon Six TL, Carl Zeiss Jena Biometar 80mm f/2.8, Fujicolor Pro 160NC, Canoscan 9900FEszter (Topkapi palace, Istanbul, Turkey) Pentacon Six TL, Carl Zeiss Jena Biometar 80mm f/2.8, Fujicolor Pro 160NC, Canoscan 9900FEszter (Büyük Selimiye Cami, Istanbul, Turkey) Pentacon Six TL, Carl Zeiss Jena Biometar 80mm f/2.8, Fujicolor Pro 160NC, Canoscan 9900FShooting with a Pentacon Six TL, Istanbul (Turkey)Artist (Istanbul, Turkey) Pentacon Six TL, Carl Zeiss Jena Biometar 120mm f/2.8, Fujicolor Pro 160NS, Canoscan 9900FHagia Sophia (Istanbul, Turkey) Pentacon Six TL, Carl Zeiss Jena Biometar 80mm f/2.8, Fujicolor Pro 160NC, Canoscan 9900F
So far I have been writing mostly about classic cameras with full mechanical construction with only one exception the Cosina CSM with an electromechanical shutter. It was because my collection fundamentally consists of such mechanical beauties.
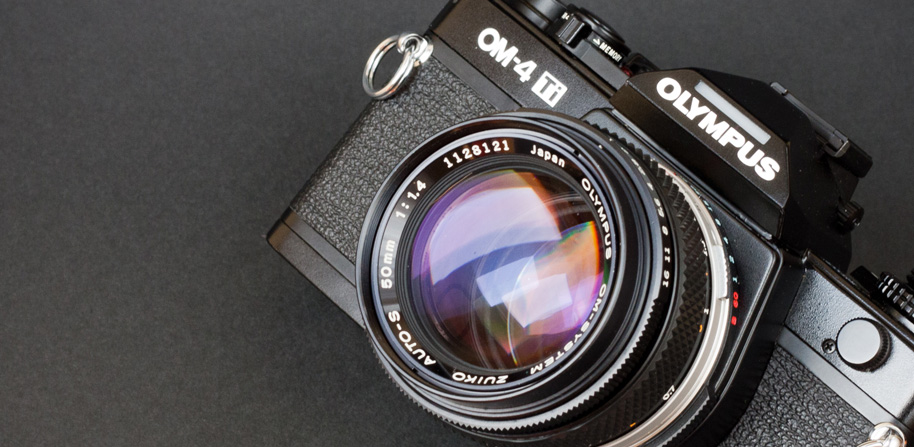
But time goes on and my camera count is also increasing in many unexpected ways. My last camera in the row is still using film and being my camera it is naturally having only manual focus, but it is an ultra-modern professional beast in every other aspect. Ladies and Gentlemen let me introduce to You the Olympus OM 4-Ti!
Olympus OM 4-Ti
Olympus OM 4-Ti (black) Datasheet
Type TTL auto-exposure 35 mm. Single Lens Reflex Camera.
Produced 1989-2002
Film type 24mm x 36mm ISO/ASA 6-3200.
Weight 540g (body only)
Dimensions 87 mm height, 139 mm width, 50 mm depth
Shutter speeds 1s-1/2000s, B, 1/60s can be used mechanically without batteries
Sync speed 1/60s but with Olympus F280 Full Synchro flash up to 1/2000s
Viewfinder dioptric correction; dioptric correction range from +1 to -3 diopters; viewfield: 97% of actual picture field; magnification: 0.84x at infinity with -0.5 diop. (50mm lens)
Exposure meter dual concentric segmented silicon photodiode, Center-weighted and multi-spot-meter (2% of view; 3.3˚ with 50 mm lens) up to 8 points
Batteries Two 1.5V silver-oxide batteries SR44 (Eveready EPX-76) or alkaline manganese batteries LR44
Self-timer 12s delay electronic self-timer
Hot shoe with contact for T series flash; 5-pin connector for T series flash; PC synchro socket.
Motor drive optional motor drive 1 or 2 can be attached, up to 5 frames per second
This camera is the latest model of the one digit (upper grade) line of Olympus OM cameras and in addition, mine is the last sub-version. While the OM 4 was introduced in 1984 my version shown up around 1990. Apart from some extra controls, the body design is pretty much the same as the original OM 1 (1972) which pioneered a new trend of really compact sized SLR bodies. Therefore this camera is one of the smallest reflex cameras ever made taking the 35mm film type.
Focusing
While other manufacturers introduced autofocus in their cameras Olympus stuck to the traditional manual focus design. There is a debate on why, but eventually, to me, the important point is that the lack of AF allowed keeping this wonderful classic shape. The lenses are also very small, there is no need to place a motor into the body, not into any lenses.
Metering
So why is this metering so legendary? Well, apart from the fact that it is reliably accurate it leaves the control in your hand. Other brands like Nikon developed metering systems where the camera compares the scene with a database of stored situations and tries to figure out the best exposure for you. It is convenient and most of the time satisfactory approach, but you have low control over it unless you switch to full manual or you guess what the camera thinks and you can compensate accordingly. It must be said that it is an issue only among challenging lighting conditions.
In contrast, the OM-4 allows you to select up to 8 points of measurements and then the camera calculates the exposure. In other words, you can select what is important for you and what are your priorities. For example, if you take to measurements on the same area and one on another than the first is more important to you than the other.
A back-light situation where both the subject and the background is measured for correct overall exposure. (OM 4-Ti instruction manual)
I know it sounds strange for first, but believe me, it is so much intuitive and joy to use after you tried once. Of course, if you don’t want to get bothered with such evilness, you can still use the traditional center weighted automatics, which just works well in most common situations.
Olympus OM 4-Ti metering and controls
All in all, for someone like me, who works with a very low frame-rate, prefers to think and focus instead of the machine but sometimes likes to get some precise support, this camera is the ultimate choice for 35mm photography. It is worth to note that (as far as I know) some professional medium format cameras also used a similar metering system.
Finally, the OM4 features a highlight and a shadow mode. It is useful in some cases where black or white surfaces are dominating on the frame. Normally if you take a photo with an auto-exposure camera of a gray, black and white piece of paper, it is likely that you will get middle gray on all frames (even instead of the black and white). It is because the metering system tries to achieve an averaged exposure which is good in most cases, but causing troubles when there is no reference. For example, a landscape covered by snow, or documents on white papers are typical cases.
To overcome this, you can use manual exposure, exposure compensation or in this case the high-light and shadow functions. You select the brightest (supposed to be white) or in other cases, the darkest (supposed to be pitch black) area on the frame, push the respective button and you will get the correct exposure with correct white or black representation. In fact, these buttons are doing simply programmed over and underexposure correction.
Flash control
Another interesting aspect is that this camera is one of the first ones able to use flash with very fast sync speeds (up to 1/2000s) when appropriate flash is coupled (like the Olympus F280). The problem of low synchronization speed was common of this kind of cameras due to the construction of the shutter and the very short burst time of typical flashguns. The OM 4-Ti solved this issue by continuous pulse bursts of the flash during the whole exposure which allowed to expose the entire frame correctly, although for the price of limited range.
Durability
This camera is very well made, it is weather sealed and indeed feels solid in my hands. All buttons, switches, and knobs work really definitely and smoothly at the same time.
But how though it is exactly? I have found a really exhaustive description about a crash test done by the Camera magazine 4/’89 (Germany) translated by Wiliam Wagenaar.
The methodology was:
The OM4Ti is stored in the freezer overnight at -20C for 8 hours.
The OM4Ti went into the oven for one hour at a temperature of 75C (Only 50C allowed according to the manual)
The OM4Ti is hung in the grid of the air outlet of a sand blasting company for 2 hours, so that dust, dirt and sand can intrude deep into the mechanics.
The OM4Ti went into a steaming hot shower cabin for on hour.
The OM4Ti went into the shaking machine for a certain time.
The shutter is operated about 15.000 times while the aperture is set at f8.
This camera survived the torture very well, only the cold caused some temporal problems with the shutter. Here are the summarized test results:
Shutter speed error: + 15% for the long times from 1/15 Meter error: none (< 0.1 EV) Spot meter: deviation of 0.5 EV Defects during test: none, except jerky manual film advance Battery use of camera and drive: normal.
Maximum points for each item : 10.
A total of 70 points gives the qualification of “CAMERA MAGAZINE PRO-CAMERA”
Item: Points:
cold test 7
heat test 10
dust test 9
moist test 10
shock test 10
internals 8
price quality 9
ease of use 8
design 8
equipment 8
Total : 87
In comparison, the Leica R6 received 88 points in the same test. If you want to read the full review, please follow this link.
Conclusion
So here is the answer to my question “What is this camera really?”. To me, this camera is a lightweight, compact tool with sophisticated metering and flash control but with the maximum control over exposure and focus possible in an admirable classic shaped yet durable body. It is unlikely that I will take advantage of the flash features, but I can clearly appreciate the excellent metering.
The lenses are very well made and with nice performance as well. Last but not least these cameras are affordable, they used to be called by many as “poor man’s Nikon” in the USA. Nowadays in the digital era, you can definitely find a good deal of an OM camera.
My Olympus OM 4-Ti
I always adored the OM cameras because of their small size, stylish design, good lenses, and reliable construction, but until now I have never even touched one. I came close in dimensions with my Cosina CSM which is really similar at first look, but clearly not in the same league at least with the professional OM cameras.
Olympus OM 4-Ti vs Cosina CSM
How did I get it?
I was not really wanted to get an OM since I had no lenses for the system, plus I was happy with the Cosina as my light travel companion. But one day I walked into a small optics shop which I didn’t know before but I was attracted by the old photo commercials on the front of the building. As it turned out they don’t sell cameras or any photographic types of equipment anymore (they focusing on eyeglasses), but I spot a few old cameras in the cabinet behind the desk.
This OM 4-Ti was among them without a lens, only the body cap was mounted. I asked it out for some inspection and I immediately knew, this camera has a place in my bag. There was no price though, so we had to call the owner of the shop who is around 80 years old and collects cameras as well. We had a nice chat but he couldn’t tell me a price neither. So we agreed to talk about the camera in a few days as he can look after a bit.
Of course, this made me struggling a lot in the proceeding few days as I was not sure that I can afford this camera at all especially because I had no lens. After a few days of hell, I went back to the shop and asked again if they decided the asking price of the camera and they had. The offer was so generous that I bought the camera right away along with some film. The man told me that he likes that I am collecting and using film cameras and I will probably have a good use of it, that is why he is selling the Olympus to me. Of course, I went back to show the camera as soon as I have got this great lens I have mounted on it right now.
Hunting for the lens and focusing screen
Because the camera is in an incredibly good condition and because it is the last evolution step of the professional OM cameras, I decided to get a lens which is matching both in capabilities and cosmetics to the body. I wanted something behind the standard 50mm f/1.8 Zuiko (which is a great lens by the way) especially because I have many f/1.8 fifties for other systems and I really preferred to have something different. On the other hand, I like standards when I have only one lens and naturally, I had a strong constraint on the money to spend.
In the end, I have gone for the Zuiko AUTO-S 50mm f/1.4 lens and I did some research which serial number to look for. It was not an easy search, but I have got my lens on e-bay in perfect shape in the original box with the serial number I was looking for (greater than 1,100,000) that marks the latest design and best coating. For more information about the different variants of this lens look around here.
After I received the lens I had to realize that my focusing screen is good for anything but normal use. The type I had in the camera was made for microscopy and other extreme macro purposes. So I had to look for a replacement focusing screen, but it was not an easy ride. I found many of these on e-bay, but on the price that I started to think if I really did a good deal with this camera. After a few weeks of desperate research, I have managed to find a screen in Hungary at a reasonable price.
Almost 2 months after I first saw the camera in the cabinet I have managed to get a working set which takes photos while I am capable of focusing with it. It cost me way more than I thought when I bought the body, but undoubtedly worth it. This is really an amazing camera to use and hold and I don’t think I would have considered getting one in any other ways.
The way it looks
Personal experience
Until now I shot only 3 rolls of film, therefore it is hard to claim that I master the camera. Nevertheless, the start is very promising as I feel very comfortable and natural to use and the initial results are encouraging as well.
Ergonomics
The ergonomics are really good, although due to the classic shape it is not as convenient to hold as more modern cameras. The bright side is that there is an optional grip available, but honestly, I don’t feel it is necessary. The layout of the buttons and other controls are nice as well, maybe the “highlight” and “shadows” buttons are not the easiest to hit blind, but I don’t think to use them often. The most interesting part of the controls for me is the OM-style shutter speed ring on the lens mount, which is unusual but also brilliant at the same time. You can set both the aperture and shutter speed at almost the same place with the same hand. Of course, it is probably not for everyone, I personally like it.
As I have mentioned already, the camera is really small even with modern standards. It is bigger than mirrorless cameras but it is definitely smaller than any budget DSLR- If you consider that it is a “full-frame” camera than it is quite an achievement.
Operation
Focusing is really easy, smooth and accurate with my fast f/1.4 lens and so far I am very happy with the metering system as well. Most of the time the normal center-weighted metering mode was fine for me with aperture priority mode. Note that aperture priority is the only automatic mode available on this camera, but in fact, this is the mode I prefer on digital cameras the most also. I have tried the spot and multi-spot metering as well with success, but I need more time to gather greater experience with them.
Battery life
I basically I took out the batteries from the Cosina CSM and put them into the Olympus. These batteries were in use for more than a year from now and so far I had no problems. Considering how tiny and cheap these batteries are and how long they last I think this camera is very economical in this respect. I have heard that the regular OM 4 was eating batteries, it seems the Ti version has corrected this issue
Test shoots
I have a Zuiko AUTO-S 50mm f/1.4 lens which has a good reputation in terms of overall image and build quality although it has some barbell distortion. I can confirm all of these statements. The lens is sharp, contrasty, not too prone to flares, the bokeh it produces is also pleasant to my eyes. Indeed the distortion is there, but it is not disturbing unless you shoot brick walls or other well defined geometrical subjects. I may make some measurements and create a lens profile in order to correct this digitally, but as I said this is a minor problem you won’t even notice in the 90% of times. The coating works great and flares are not really threatening you, I think a lens hood is generally a good idea, so I will get one soon.
As for other lenses, I really wish to get some exotic ones most notably the Zuiko 80mm f/2 is my greatest wish for portraits.
Everyone who loves 35mm film photography and needs a light, reliable and stylish companion. It is for everyone who likes to focus manually and prefers full control over metering yet likes to have a sophisticated system to aid the evaluation of exposure times. Last but not least this camera for those who do not mind to keep a pair of small knob batteries in their pockets.
This camera is NOT for:
I don’t recommend this camera for automation junkies, action or sports shooters or in contrast for more conservative people who prefer full mechanical constructions. In the case, if the electronic operation would be the problem, there are plenty of full mechanical choices in the OM series such as the OM 1 or the very rare mechanical counterpart of the OM 4 the OM 3.
omexperience (really cool blog about film OM cameras, OM lenses with deep tests and the OM-D, This site helps you figure out which subversion of a lens has multi-coating etc based on cosmetics and serial numbers)
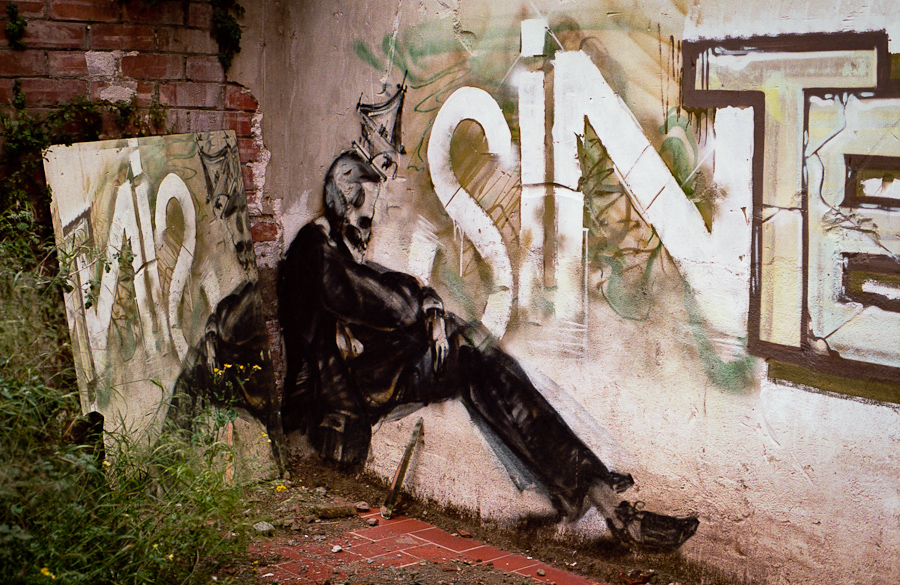
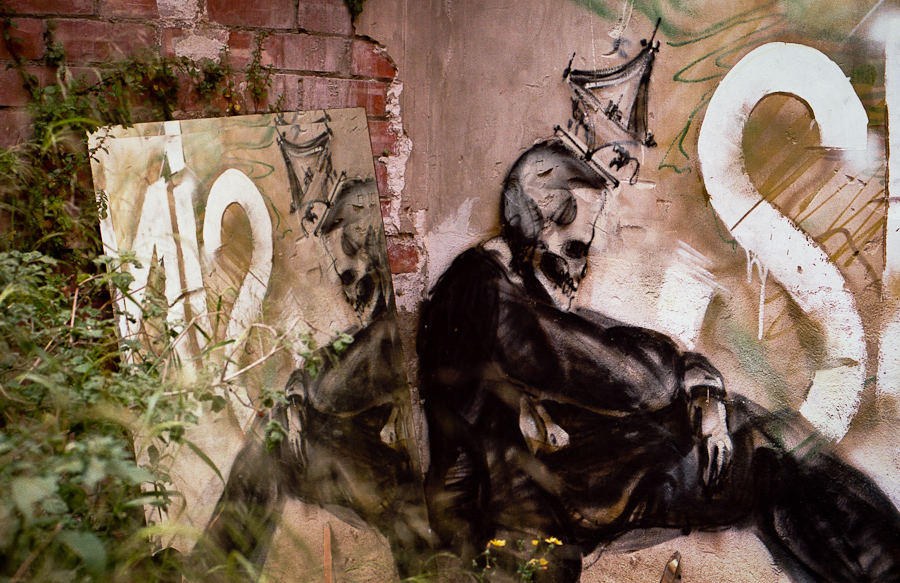
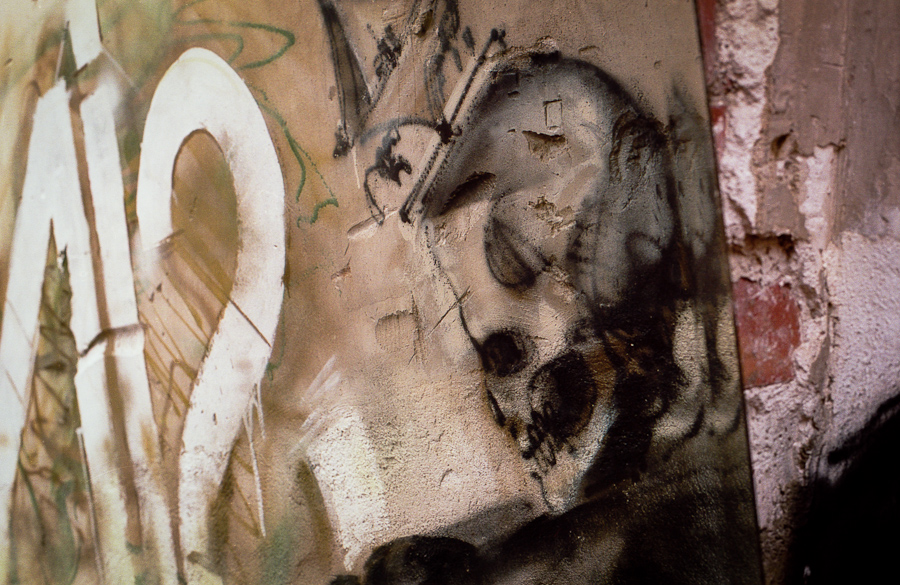
Sometimes you can unexpectedly run into true pieces of artwork even on the most odd locations. So did we in Barcelona during one of our typical disoriented big-city exploratory walk. Eszter spot the scene which can be easily called as installation, but in the same time she urged me to hurry up so I had to take the shoots really quickly.
For me the interesting aspect of these images is the fact that the key components of the composition are probably done by separate individuals who did not know about each others actions.
Someone painted the depressed skeleton in the suit.
I guess the textual graffiti on the wall was made by someone else.
A 3rd person placed the mirror next to the wall, I think his motivation was simply to get rid of it.
Of course the house must have been braked down in order to expose the surface to paint, and in addition nature started to take back what was originally belonging to her.
Than I came and take a few shoots about this partially intended but mainly spontaneous temporal exhibition.
Each of the contributors had their own motivation and in some cases story to tell. Did the painters know about the future extensions? Does this evolution step altered their initial message if there were any. What will be the next step along the life of this composition? Can it be comprehended as art?
These are hard questions to answer especially the last one which is indeed a philosophical one. One thing is sure, these kind of spontaneous exhibitions can be found everywhere, it is up to us to notice them and freeze them via a photograph, because they will disappear eventually.


