Olympus OM 4-Ti black

So far I have been writing mostly about classic cameras with full mechanical construction with only one exception the Cosina CSM with an electromechanical shutter. It was because my collection fundamentally consists of such mechanical beauties.

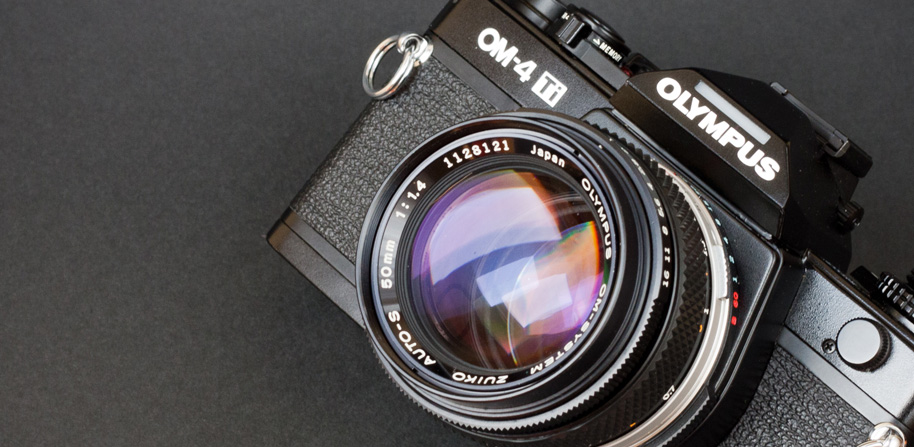
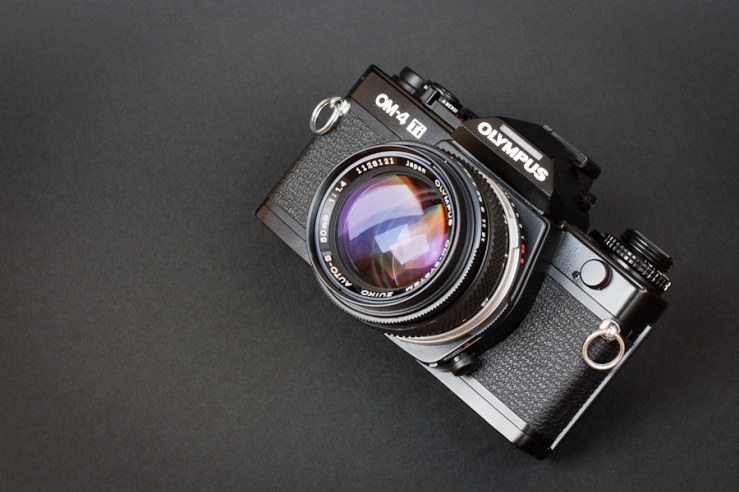
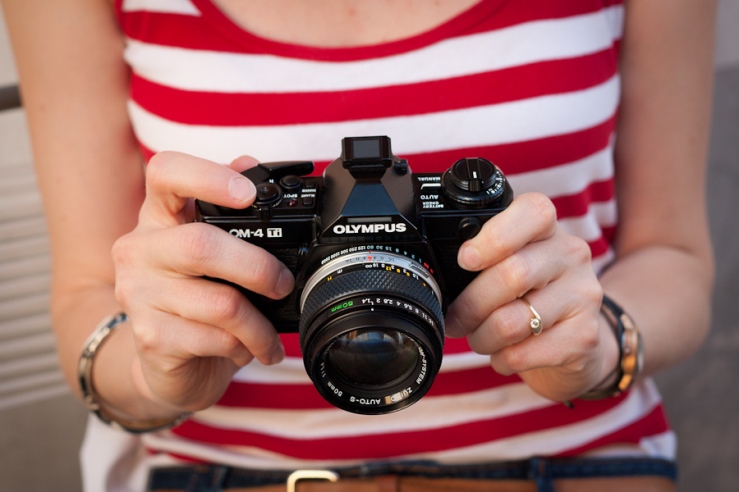
But time goes on and my camera count is also increasing in many unexpected ways. My last camera in the row is still using film and being my camera it is naturally having only manual focus, but it is an ultra-modern professional beast in every other aspect. Ladies and Gentlemen let me introduce to You the Olympus OM 4-Ti!

Olympus OM 4-Ti
Olympus OM 4-Ti

Olympus OM 4-Ti (black) Datasheet

  • Type TTL auto-exposure 35 mm. Single Lens Reflex Camera.
  • Produced 1989-2002
  • Film type 24mm x 36mm ISO/ASA 6-3200.
  • Weight 540g (body only)
  • Dimensions 87 mm height, 139 mm width, 50 mm depth
  • Construction weather sealed titanium alloy body
  • Lens mount Olympus OM Mount
  • Shutter horizontal cloth focal plane shutter, electronically controlled
  • Shutter speeds 1s-1/2000s, B, 1/60s can be used mechanically without batteries
  • Sync speed 1/60s but with Olympus F280 Full Synchro flash  up to 1/2000s
  • Viewfinder dioptric correction; dioptric correction range from +1 to -3 diopters; viewfield: 97% of actual picture field; magnification: 0.84x at infinity with -0.5 diop. (50mm lens)
  • Exposure meter dual concentric segmented silicon photodiode, Center-weighted and multi-spot-meter (2% of view; 3.3˚ with 50 mm lens) up to 8 points
  • Batteries   Two 1.5V silver-oxide batteries SR44 (Eveready EPX-76) or alkaline manganese batteries LR44
  • Self-timer 12s delay electronic self-timer
  • Hot shoe with contact for T series flash; 5-pin connector for T series flash; PC synchro socket.
  • Motor drive optional motor drive 1 or 2 can be attached, up to 5 frames per second

//pagead2.googlesyndication.com/pagead/js/adsbygoogle.js

(adsbygoogle = window.adsbygoogle || []).push({});

What is it really?

This camera is the latest model of the one digit (upper grade) line of Olympus OM cameras and in addition, mine is the last sub-version. While the OM 4 was introduced in 1984 my version shown up around 1990. Apart from some extra controls, the body design is pretty much the same as the original OM 1 (1972) which pioneered a new trend of really compact sized SLR bodies. Therefore this camera is one of the smallest reflex cameras ever made taking the 35mm film type.

Focusing

While other manufacturers introduced autofocus in their cameras Olympus stuck to the traditional manual focus design. There is a debate on why, but eventually, to me, the important point is that the lack of AF allowed keeping this wonderful classic shape.  The lenses are also very small, there is no need to place a motor into the body, not into any lenses.

Metering

So why is this metering so legendary? Well, apart from the fact that it is reliably accurate it leaves the control in your hand. Other brands like Nikon developed metering systems where the camera compares the scene with a database of stored situations and tries to figure out the best exposure for you. It is convenient and most of the time satisfactory approach, but you have low control over it unless you switch to full manual or you guess what the camera thinks and you can compensate accordingly. It must be said that it is an issue only among challenging lighting conditions.

In contrast, the OM-4 allows you to select up to 8 points of measurements and then the camera calculates the exposure. In other words, you can select what is important for you and what are your priorities. For example, if you take to measurements on the same area and one on another than the first is more important to you than the other.

A back-light situation where both the subject and the background is measured for correct overall exposure. (OM 4-Ti instruction manual)

I know it sounds strange for first, but believe me, it is so much intuitive and joy to use after you tried once. Of course, if you don’t want to get bothered with such evilness,  you can still use the traditional center weighted automatics, which just works well in most common situations.

multispot metering
Olympus OM 4-Ti metering and controls

All in all, for someone like me, who works with a very low frame-rate, prefers to think and focus instead of the machine but sometimes likes to get some precise support, this camera is the ultimate choice for 35mm photography. It is worth to note that (as far as I know) some professional medium format cameras also used a similar metering system.

Finally, the OM4 features a highlight and a shadow mode. It is useful in some cases where black or white surfaces are dominating on the frame. Normally if you take a photo with an auto-exposure camera of a gray, black and white piece of paper, it is likely that you will get middle gray on all frames (even instead of the black and white). It is because the metering system tries to achieve an averaged exposure which is good in most cases, but causing troubles when there is no reference. For example, a landscape covered by snow, or documents on white papers are typical cases.

To overcome this, you can use manual exposure, exposure compensation or in this case the high-light and shadow functions. You select the brightest (supposed to be white) or in other cases, the darkest (supposed to be pitch black) area on the frame, push the respective button and you will get the correct exposure with correct white or black representation. In fact, these buttons are doing simply programmed over and underexposure correction.

Flash control

Another interesting aspect is that this camera is one of the first ones able to use flash with very fast sync speeds (up to 1/2000s) when appropriate flash is coupled (like the Olympus F280). The problem of low synchronization speed was common of this kind of cameras due to the construction of the shutter and the very short burst time of typical flashguns. The OM 4-Ti solved this issue by continuous pulse bursts of the flash during the whole exposure which allowed to expose the entire frame correctly, although for the price of limited range.

Durability

This camera is very well made, it is weather sealed and indeed feels solid in my hands. All buttons, switches, and knobs work really definitely and smoothly at the same time.

But how though it is exactly? I have found a really exhaustive description about a crash test done by the Camera magazine 4/’89 (Germany) translated by Wiliam Wagenaar.

The methodology was:

  1. The OM4Ti is stored in the freezer overnight at -20C  for 8 hours.
  2. The OM4Ti went into the oven for one hour at a  temperature of 75C (Only 50C allowed according to the  manual)
  3. The OM4Ti is hung in the grid of the air outlet of a sand blasting company for 2 hours, so that dust, dirt and  sand can intrude deep into the mechanics.
  4. The OM4Ti went into a steaming hot shower cabin for on  hour.
  5. The OM4Ti went into the shaking machine for a certain time.
  6. The shutter is operated about 15.000 times while the aperture is set at f8.

This camera survived the torture very well, only the cold caused some temporal problems with the shutter. Here are the summarized test results:

Shutter speed  error: + 15% for the long times from 1/15
 Meter error: none (< 0.1 EV)
 Spot meter: deviation of 0.5 EV
Defects during test:  none, except jerky manual film advance
 Battery use of camera and drive:  normal.

Maximum points for each item : 10.
A total of 70 points gives the qualification of  “CAMERA MAGAZINE PRO-CAMERA”
Item:   Points:

  • cold test   7
  • heat test   10
  • dust test   9
  • moist test  10
  • shock test  10
  • internals   8
  • price quality       9
  • ease of use 8
  • design      8
  • equipment  8

 Total :         87

In comparison, the Leica R6 received 88 points in the same test. If you want to read the full review, please follow this link.

Conclusion

So here is the answer to my question “What is this camera really?”. To me, this camera is a lightweight, compact tool with sophisticated metering and flash control but with the maximum control over exposure and focus possible in an admirable classic shaped yet durable body. It is unlikely that I will take advantage of the flash features, but I can clearly appreciate the excellent metering.

The lenses are very well made and with nice performance as well. Last but not least these cameras are affordable, they used to be called by many as “poor man’s Nikon” in the USA. Nowadays in the digital era, you can definitely find a good deal of an OM camera.

My Olympus OM 4-Ti

I always adored the OM cameras because of their small size, stylish design, good lenses, and reliable construction, but until now I have never even touched one. I came close in dimensions with my Cosina CSM which is really similar at first look, but clearly not in the same league at least with the professional OM cameras.

Olympus OM 4-Ti vs Cosina CSM

How did I get it?

I was not really wanted to get an OM since I had no lenses for the system, plus I was happy with the Cosina as my light travel companion. But one day I walked into a small optics shop which I didn’t know before but I was attracted by the old photo commercials on the front of the building. As it turned out they don’t sell cameras or any photographic types of equipment anymore (they focusing on eyeglasses), but I spot a few old cameras in the cabinet behind the desk.

This OM 4-Ti was among them without a lens, only the body cap was mounted. I asked it out for some inspection and I immediately knew, this camera has a place in my bag. There was no price though, so we had to call the owner of the shop who is around 80 years old and collects cameras as well. We had a nice chat but he couldn’t tell me a price neither. So we agreed to talk about the camera in a few days as he can look after a bit.

Of course, this made me struggling a lot in the proceeding few days as I was not sure that I can afford this camera at all especially because I had no lens. After a few days of hell, I went back to the shop and asked again if they decided the asking price of the camera and they had. The offer was so generous that I bought the camera right away along with some film. The man told me that he likes that I am collecting and using film cameras and I will probably have a good use of it, that is why he is selling the Olympus to me. Of course, I went back to show the camera as soon as I have got this great lens I have mounted on it right now.

Olympus OM4-Ti

Hunting for the lens and focusing screen

Because the camera is in an incredibly good condition and because it is the last evolution step of the professional OM cameras, I decided to get a lens which is matching both in capabilities and cosmetics to the body. I wanted something behind the standard 50mm f/1.8 Zuiko (which is a great lens by the way) especially because I have many f/1.8 fifties for other systems and I really preferred to have something different. On the other hand, I like standards when I have only one lens and naturally, I had a strong constraint on the money to spend.

In the end, I have gone for the Zuiko AUTO-S 50mm f/1.4 lens and I did some research which serial number to look for. It was not an easy search, but I have got my lens on e-bay in perfect shape in the original box with the serial number I was looking for (greater than 1,100,000) that marks the latest design and best coating. For more information about the different variants of this lens look around here.

After I received the lens I had to realize that my focusing screen is good for anything but normal use. The type I had in the camera was made for microscopy and other extreme macro purposes. So I had to look for a replacement focusing screen, but it was not an easy ride. I found many of these on e-bay, but on the price that I started to think if I really did a good deal with this camera. After a few weeks of desperate research, I have managed to find a screen in Hungary at a reasonable price.

Almost 2 months after I first saw the camera in the cabinet I have managed to get a working set which takes photos while I am capable of focusing with it. It cost me way more than I thought when I bought the body, but undoubtedly worth it. This is really an amazing camera to use and hold and I don’t think I would have considered getting one in any other ways.

The way it looks

Personal experience

Until now I shot only 3 rolls of film, therefore it is hard to claim that I master the camera. Nevertheless, the start is very promising as I feel very comfortable and natural to use and the initial results are encouraging as well.

Ergonomics

The ergonomics are really good, although due to the classic shape it is not as convenient to hold as more modern cameras. The bright side is that there is an optional grip available, but honestly, I don’t feel it is necessary. The layout of the buttons and other controls are nice as well, maybe the “highlight” and “shadows” buttons are not the easiest to hit blind, but I don’t think to use them often. The most interesting part of the controls for me is the OM-style shutter speed ring on the lens mount, which is unusual but also brilliant at the same time. You can set both the aperture and shutter speed at almost the same place with the same hand. Of course, it is probably not for everyone, I personally like it.

As I have mentioned already, the camera is really small even with modern standards. It is bigger than mirrorless cameras but it is definitely smaller than any budget DSLR- If you consider that it is a “full-frame” camera than it is quite an achievement.

Olympus OM4-Ti

Operation

Focusing is really easy, smooth and accurate with my fast f/1.4 lens and so far I am very happy with the metering system as well. Most of the time the normal center-weighted metering mode was fine for me with aperture priority mode. Note that aperture priority is the only automatic mode available on this camera, but in fact, this is the mode I prefer on digital cameras the most also. I have tried the spot and multi-spot metering as well with success, but I need more time to gather greater experience with them.

Battery life

I basically I took out the batteries from the Cosina CSM and put them into the Olympus. These batteries were in use for more than a year from now and so far I had no problems. Considering how tiny and cheap these batteries are and how long they last I think this camera is very economical in this respect. I have heard that the regular OM 4 was eating batteries, it seems the Ti version has corrected this issue

Test shoots

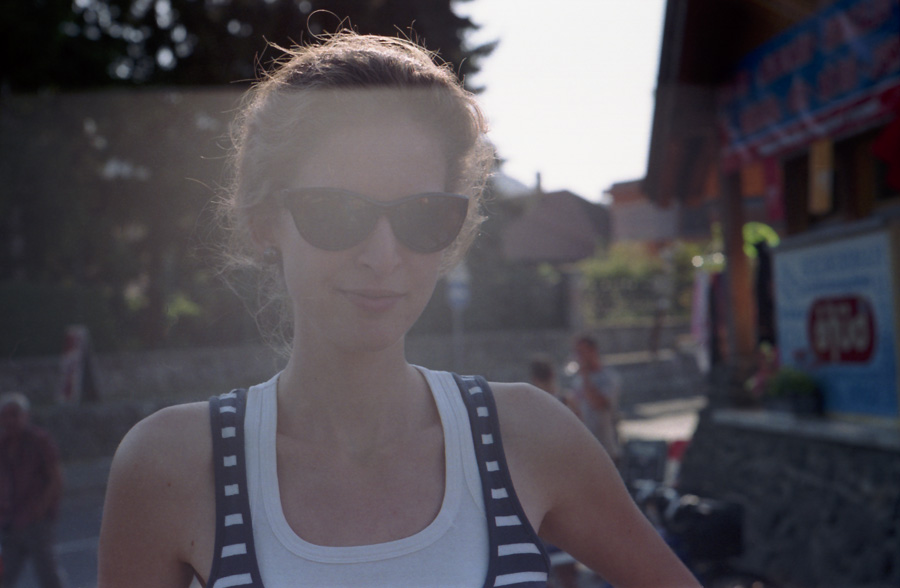
I have a Zuiko AUTO-S 50mm f/1.4 lens which has a good reputation in terms of overall image and build quality although it has some barbell distortion. I can confirm all of these statements. The lens is sharp, contrasty, not too prone to flares, the bokeh it produces is also pleasant to my eyes. Indeed the distortion is there, but it is not disturbing unless you shoot brick walls or other well defined geometrical subjects. I may make some measurements and create a lens profile in order to correct this digitally, but as I said this is a minor problem you won’t even notice in the 90% of times. The coating works great and flares are not really threatening you, I think a lens hood is generally a good idea, so I will get one soon.

As for other lenses, I really wish to get some exotic ones most notably the Zuiko 80mm f/2 is my greatest wish for portraits.

Márk (Gyöngyössolymos, Hungary), Olympus OM 4-Ti, Zuiko 50mm f/1.4, Fomapan 100, Kodak 76, Canoscan 9900F
Eszter (Budapest, Hungary), Olympus OM 4-Ti, Zuiko 50mm f/1.4, Kodak portra 160NC expired, Canoscan 9900F
Eszter (Budapest, Hungary), Olympus OM 4-Ti, Zuiko 50mm f/1.4, Fomapan 100, Kodak 76, Canoscan 9900F
Temps de flors Girona 2012, Olympus OM 4-Ti, Zuiko 50mm f/1.4, Kodak portra 160NC expired, Canoscan 9900F
(Budapest, Hungary), Olympus OM 4-Ti, Zuiko 50mm f/1.4, Kodak portra 160NC expired, Canoscan 9900F

Some other OM 4-ti shoots of mine in this post.

Recommendations

This camera is for:

Everyone who loves 35mm film photography and needs a light, reliable and stylish companion. It is for everyone who likes to focus manually and prefers full control over metering yet likes to have a sophisticated system to aid the evaluation of exposure times. Last but not least this camera for those who do not mind to keep a pair of small knob batteries in their pockets.

This camera is NOT for:

I don’t recommend this camera for automation junkies, action or sports shooters or in contrast for more conservative people who prefer full mechanical constructions. In the case, if the electronic operation would be the problem, there are plenty of full mechanical choices in the OM series such as the OM 1 or the very rare mechanical counterpart of the OM 4 the OM 3.

Links

Collaborative street art

Sometimes you can unexpectedly run into true pieces of artwork even on the most odd locations. So did we in Barcelona during one of our typical disoriented big-city exploratory walk.  Eszter spot the scene which can be easily called as installation, but in the same time she urged me to hurry up so I had to take the shoots really quickly.

For me the interesting aspect of these images is the fact that the key components of the composition are probably done by separate individuals who did not know about each others actions.

  • Someone painted the depressed skeleton in the suit.
  • I guess the textual graffiti  on the wall was made by someone else.
  • A 3rd person placed the mirror next to the wall, I think his motivation was simply to get rid of it.
  • Of course the house must have been braked down in order to expose the surface to paint, and in addition nature started to take back what was originally belonging to her.

Than I came and take a few shoots about this partially intended but mainly spontaneous temporal exhibition.

Each of the contributors had their own motivation and in some cases story to tell. Did the painters know about the future extensions? Does this evolution step altered their initial message if there were any. What will be the next step along the life of this composition? Can it be comprehended as art?

These are hard questions to answer especially the last one which is indeed a philosophical one.  One thing is sure, these kind of spontaneous exhibitions can be found everywhere, it is up to us to notice them and freeze them via a photograph, because they will disappear eventually.

Barcelona, Olympus OM-4 Ti, Zuiko auto-s 50mm f/1.4, Kodak Porta 160 NC, Canoscan 9900F

Jupiter 8

Jupiter 8 50mm f/2 LTM and Contax version

The Jupiter 8 is undoubtedly a magnificent piece of glass! To me it is more than a great lens it is a magical item like an exotic rare wand which can be really powerful in the hands of a trained wizard. What makes it so special is the underlying optical formula at the first place which is the pre-war Zeiss Sonnar 50mm f/2 [1] developed by Ludwig Bertele in the early 1930s.

In other words, the Jupiter 8 is a post-war Soviet copy of the pre-war Zeiss Sonnar initially made for the Contax copy Kiev cameras like the Kiev 4 I have already written about. The optical formula alongside the Contax II camera was acquired after the war by the Soviet Union as well as machinery and technical personnel as part of the war compensation.

So let’s look at the formula itself!

Jupiter 8 (Zeiss Sonnar) formula

The Jupiter 8 is 6 elements in 3 groups partially glued anastigmat. The first group is a separate meniscus, the middle group consists of a meniscus, two times convex and two times concave lenses glued together and the third group is a composed of a two times convex lens and a meniscus.

The sonnar negative triplet consisted of a high-index outside and a lower-index element between. The design uses less elements than Planar, so when coating tech was primitive, the lens had much less flare due to less surfaces in design. Simpler than Planar, smaller and comparatively inexpensive. Good contrast at edges at all apertures. Exhibits some softness at wide apertures. Sharp when stopped down.[2]

Interesting fact that the name Sonnar was derived from the German word “Sonne” (Sun).

With the addition of more lens elements, the lens speed can be further increased like the Zeiss Sonar 50mm f/1.5 or the Soviet counterpart  Jupiter 3 50mm f/1.5 which contains 7 elements in contrast to the 6 elements only f/2 version I am writing about here.

Naturally, as anything can be advanced even further,   the Sonnar formula can be modified to achieve aperture greater than f/1 like in the case of the Tachon. But this is really a different story and I should not get that far in this post. So let’s go back to the starting point (Jupiter 8 and Zeiss Sonnar 50mm f/2 formula).

To make you more excited (I know you are already itching because of the Sonnar formula :-)) here is a photo where I “accidentally” inserted THE mighty Carl Zeiss Jena Sonnar 180mm f/2.8 Pentacon Six mounted lens into the frame as a comparison. This lens is not mine (Thank you László for lending it to me!) but you can expect exhaustive writings about it at some point as well

Jupiter 8 lenses vs CZJ Sonnar 180mm f/2.8

My Jupiter 8 lenses

I have got my first Jupiter 8 with my beloved Kiev 4 camera from a Hungarian auction site. I was so pleased with the results I have got from this lens that I have picked up two more instances with L39 thread mount for my screw mount rangefinders (Fed 3, Fed 5).  I have got them in one package from the same auction site for a real bargain. One of these will go to a friend who will hopefully enjoy it a lot on a digital mirror-less system camera. Yes, these lenses can be great fun on MILC cameras and here is an excellent article of what can you achieve.

Jupiter 8 L39 screw mount

The Jupiter 8 was made originally for the Contax copy Kiev cameras with the matching bayonet mount, but later it was made in many different versions for L39 (Leica thread) mount rangefinders.

The advantage of the L39 screw mount version over my original Contax mount lens is the ability to focus with the lens itself. On Contax system cameras the focusing is done by a mechanism integrated into the camera body and the lens has nothing to do with it. The only thing you can do with the lens is set the aperture.

Focal length:50mm
Construction:6 elements in 3 groups
Angle of view:45°
Distance scale:1m – infinity
Diaphragm:Manual; f/2 – f/22
Filter size:40.5mm thread
Length:±45mm
Weight:±130g
Fitting:L39

Specification table [3]

Construction and handling

My L39 Jupiter 8 lenses (1960, 1963) are made of aluminum alloy, therefore they are very light but at the same time vulnerable too. I never drooped any lens so far, and I hope I will keep this good habit.

The aperture rings on both lenses are a bit dry and have no stops or clicks, therefore, the aperture must be set with great care. The focusing rings are nice and smooth on both lenses, which gave me the impression that these lenses were lubricated once after their production. What I do like the most is the metal lens caps though.

The overall build quality is fair but nothing outstanding, yet pretty good for Soviet lenses. By the way, Jupiter 8 is one of the most reliable FSU (Former Soviet Union) lenses in terms of quality. Most instances are focusing good and have a nice optics while Jupiter 3 instances are a real gamble.

How do they look like

Jupiter 8 L39 mount
Jupiter 8 L39 mount

Jupiter 8M Contax mount

The Jupiter 8M differs from the Jupiter 8 in only one thing! The 8M has stops/clicks while setting the apertures. This is a nice improvement indeed although some videographers might prefer the original version.

As I mentioned the Contax mount type has no focusing mechanism on the lens, therefore, it never needs lubrication and probably it was a bit cheaper to produce for the more complicated and expensive camera body.

Construction and handling

My instance (1965) is made of steel which makes it heavier than the screw mounts aluminum versions despite the simpler mechanical construction. It also feels much more solid and the click stops on the aperture ring are very welcomed additions. Overall, this version just feels and handles better for me and does suggest a higher quality because of the steel barrel.

How does it look like

Jupiter 8M Contax mount
Jupiter 8M Contax mount aperture shape at f/4

Image quality

So what is the big thing with this lens (and any other Sonnars)? Of course, the way it renders the image is the thing for me. Many claims that the contrast is a bit lower than the Tessar type lenses and Sonnars are not outstandingly sharp wide open but fast apertures can be achieved,  they deliver a wonderful creamy bokeh and less resistant to flare due to the few glasses to air transitions. All this sounds like a great portrait lens especially because Sonnars are typically short and medium telephoto lenses.

Well, this is the theory, but let the samples talk.

3D-ness and character

The following image is taken by me with the lovely Kiev 4 rangefinder and it was on the very first roll I have ever shot with that camera.

First of all, I really love the 3D like the character of this image, the backgrounds fall to be blurred slowly while the model is quite sharp. I don’t remember what aperture I used but it must have been around f/4, so in theory, this effect could be even more emphasized by a wider setting. On the other hand, I like that the background is recognizable.

I have not done any serious post processing apart from crop and a tiny bit of contrast increase, so this lens/film combination is capable to produce similar images without any super scientific computerized evilness.

Note the flare effect on the top right corner of the frame! I know Sonnars must be less prone to flare but in reality, these old lenses have got a not too effective coating to compare to modern standards. Therefore the lens hood is a must if you (like me) prefers to shoot in back-light.

Flare

Flare can be a real issue but not because of the formula rather the ancient coating used for these old lenses.

This example (left) shows what could really happen when the sun shines (almost) directly into the lens. Although the sun is not in the frame (It was upper a bit) it did ruin the shoot by this ugly flare. This could have been way better by the usage of a lens-hood or by shooting from a different angle.

I know I have already written down here a couple of times but it is never enough to emphasize: Always use lens-hood for vintage lenses when possible unless you want to get more flares (which could be fun for some).

Sharpness and contrast

The next two images are supposed to stand here as examples of how nice sharp, contrasty and colorful images can you get when the conditions are appropriate and of course you don’t mess up with the exposure.

Church (Szentendre, Hungary) Kiev 4, Jupiter 8M, Fuji Superia 200, Canoscan 9900F
Designer’s chairs (Girona Spain) Kiev 4, Jupiter 8M, Fuji Superia 200, Canoscan 9900F

The second shoot with the chairs is done through the glass of a showcase and you can even see my reflections on it, but still, I am very satisfied with the result especially the colors which I like the most. Fuji Superia is a consumer level “cheap” film, yet what it delivers is simply lovely to my eyes.

Portraits and bokeh

The Jupiter 8 being a 50mm “standard” lens is quite versatile and can be used for many different purposes and portraiture is not an exception. It is just long enough to take nice upper torso portraits while showing some of the environment around the model thus giving a little bit of context. Also as you can see, it can produce a nicely blurred background which is essential for the separation of the model.

Yolanda (Catalonia) Kiev 4, Jupiter 8M, Fuji Superia 200, Canoscan 9900
PepLluis (Catalonia) Kiev 4, Jupiter 8M, Fuji Superia 200, Canoscan 9900F

These portraits were taken in a restaurant in mixed light and with maximum f/2 aperture. The depth of field is certainly shallow enough and the background is pleasant in my opinion.

The next photo has been already published in my Kiev-4 post but with heavy post-processing including black&white conversion. The original version looks like this and notices the character of the bokeh at f/2.8.

Pista bácsi(Szentendre, Hungary) Kiev 4, Jupiter 8M, Fuji Superia 200, Canoscan 9900F

I didn’t like the photo because of the dark foreground, so I created this processed version in black and white with aggressively increased contrast.

Pista bácsi (Processed) (Szentendre, Hungary) Kiev 4, Jupiter 8M, Fuji Superia 200, Canoscan 9900F

Final words

All in all, I really love these lenses because of their great character, bokeh and overall image quality which together leads to a unique classic look. It is true that they are not the only and probably not the best Zeiss Sonnar type of lenses ever made but surely the Jupiter 8 is the cheapest to start with.

You can find many more advanced versions made by Zeiss, Nikon, Canon, and others. Even today you can find new Sonnar type lenses by many manufacturers and of course, you can get a new Zeiss Sonar T* 1.5/50 ZM which was reviewed by Ken Rockwell here.

These lenses are not perfect but they have a unique fingerprint on the images and it is only a matter of taste to love or hate. I am definitely will carry this or similar lenses with me all the time.

I hope I could transfer a part of my excitement related to the Jupiters, Sonnars and their siblings and you will have great moments with them too.

Morning lights (Girona, Catalonia) Kiev 4, Jupiter 8M, Fuji Superia 200, Canoscan 9900F

Links and references

Underpass music

I admire very much photographers who are able to do street photography of any kind either shooting invisibly or by asking strangers for a photo. Although I love these kinds of photographs I did not dare to do anything like this, therefore. As you have probably noticed already I shoot my friends and relatives most of the times as the same persons appear many times on my blog. All in all, talking to and taking photos of strangers is somewhat natural for some but for most of us including myself it is a challenge.

This is fine actually, but I always try to do new things and find challenges in my photography and the temptation of getting wonderful shots on the street raised so high that eventually I asked someone for a photo and hopefully I will keep doing this practice.

It was easier than I thought, nothing bad had happened, he was very friendly and allowed me to take the shoots below. As you can see he is a musician playing guitar in many places like this underpass  I used to walk through regularly.

I know this is not really a traditional street shoot but can be considered as a street portrait similar to those Ade used to shoot with his medium format Pentax and publish on STREET PORTRAITIST blog I really like.

The camera I used is the latest member of my collection an Olympus OM 4Ti with a stellar Zuiko 50mm f/1.4 lens. It was the very first roll of film I moved trough of this little thing and I am quite happy with the results.

 Olympus OM 4Ti, Zuiko 50mm f/1.4, Kodak Gold 200, Canoscan 9900F
Gábor (Szentendre, Hungary), Olympus OM 4Ti, Zuiko 50mm f/1.4, Kodak Gold 200, Canoscan 9900F

 Olympus OM 4Ti, Zuiko 50mm f/1.4, Kodak Gold 200, Canoscan 9900F
Gábor (Szentendre, Hungary), Olympus OM 4Ti, Zuiko 50mm f/1.4, Kodak Gold 200, Canoscan 9900F

 Olympus OM 4Ti, Zuiko 50mm f/1.4, Kodak Gold 200, Canoscan 9900F
Gábor (Szentendre, Hungary), Olympus OM 4Ti, Zuiko 50mm f/1.4, Kodak Gold 200, Canoscan 9900F

Exakta Varex IIa

Exakta Varex IIa

“Woow!” This was the first thing came into my mind when I first saw an Exakta in a cabinet in a very small and messy shop of an old camera-repairman a couple of years ago. The second thing? Well, I seriously considered to lick it quickly while the owner looked away. It never happened due to the glass door of the cabinet and I can still feel the sensation of the missed opportunity -What a pity-.

Apart from the joke, I had been seriously touched by the appearance of this family of cameras, especially the older ones. It is an entirely mechanical, full glass, bare metal, chrome and leather piece of jewelry. I am almost certain that this camera triggered the entire steam-punk culture. There is no doubt that this is one of the most beautiful classic cameras of all times.

“True” Exaktas were manufactured by Ihagee in Dresden during almost 4 decades which resulted in an amazingly complete and comprehensive camera system. While I always keen to give a bit of historical overview of a camera system, I had to realize that others have done this on a level I simply cannot match. If you were interested in the different variants and history, please visit this link.  I limit myself to the most interesting facts I found out during my research and consider this post as a kind of tribute to Exakta and the company made it Ihagee.

It is interesting to know that the Exakta camera system was very stable during its evolution, almost all parts were interchangeable among models which are remarkable. There was a huge sort of accessories available for these cameras and they were heavily used for technical and scientific photography. I think this system was one of the most versatile at the time. For example, you can see below a commercial from a 1952 German magazine Die Fotografie where the camera is attached to a microscope.

Commercials from the magazine Die Fotografie 1952
Old poster in a camera shop (Budapest, Hungary)

The Exakta Varex was introduced in 1950 and the big innovation was the possibility to use the camera with the standard waist level finder or with a pentaprism. This interchangeable viewfinder system even further increased the versatility of the camera.   In addition, there were a big number of available finders of both types (4 basic pentaprism types) and all of them allowed to use a huge variety of focusing screens on top of it. They claimed in their commercials, that they merged the good old experience with modern ideas. You can check out the complete list of finders and screens on this page.

One of the interesting characteristics of this camera is the left-handed shutter release which (I believe) is inherited from the times when the camera used only waist level finder. It is very awkward at first and even at the second time to handle the camera because of this using the prism for those who got socialized on right-handed cameras. I guess it was no problem initially with the waist level finder and they kept this property. In fact, it is possible to get used to it, but it requires quite a commitment.

Commercials

I have managed to dig out a couple of high-quality commercials and posters released by Ihagee, this cool half cut camera poster can be seen in a camera shop in Hungary (Soós Fotó).  I have found and included in this post many more nice illustrations from books and magazines. It shows that the Exakta was really among the most prestigious SLRs at the time. It was literally the ultimate way to go for every possible purpose from photojournalism to science and technical applications where larger formats could not be convenient to use.

Commercials from the magazine Die Fotografie 1952

My Exakta

My Exakta is a subtype of the very long lasting and successful Varex IIa. This version was released in 1960 and the distinguishing feature is the logo which is not pressed into the metal anymore and the shape of the prism is slightly different than earlier models.

Varex IIa datasheet

  • Produced 1957-1963 this version was introduced1960
  • Film type 135 (35mm)
  • Lens mount Exakta mount (inner and outer bayonet)
  • Shutter cloth curtain (traveling horizontally)
  • Shutter speeds 12s – 1/1000, B
  • Sync speed 1/50
  • Viewfinder interchangeable waist level or prism
  • Exposure meter none
  • Self-timer
  • PC sync connections
  • Internal film cutting blade

This particular camera was sold in Antwerp, Belgium in 1961 and according to the catalog I have, the list price was 13.185 francs with the prism and Tessar standard lens. The second lens (Trioplan 100mm) had the price of 4.205 francs. I am trying to find out what could that mean at that time, but one thing is sure in Hungary this combo would have cost a complete year salary of a regular person in the 60s. In comparison for a Russian Zenit SLR, some had to work like hell for 2-3 months while consuming solar energy only for survival in Hungary those times.

The camera actually belongs to my Friend David who was kind enough to give it to me for use as he did with the Yashica TL-SUPER camera I reviewed. He received it from the original owner from Belgium, so I can actually track back the history of this camera until the beginning. Thank you again, David!

The camera came in the every-ready case, with 2 wonderful lenses. a high-quality B+W filer, a nice rare Carl Zeiss Jena polar filter, a Sunpak flash unit and all sort of documentation including warranty, and catalogs.

Exakta Varex IIa, Carl Zeiss Jena Tessar, Meyer Optic Trioplan, B+W filter, hard-case, catalogs,  warranty
Exacta Varex IIa in hard-case

Condition and repairs

Lens

The overall condition of the camera is very good, although the Tessar lens was really stiff, it was very hard to focus on.  In the opinion of my repair-man, it could have been stored in a cold place for a while. I have got the lens cleaned and lubricated and now it is as good as new. Again, the arts of lubrication was successfully applied, plus apertures and glass elements got some attention and cleaning. Important to note that the focusing ring is covered with some kind of plastic which became rigid over the years, and it is advised to take care of it as it is very fragile and can be broken for any little hit. If it breaks it needs to be replaced by leather with a similar texture which is a hideous task to do.

Shutter

The shutter was advanced when I first got it in hand, so the springs were tensed probably for many years ago and as it turned out the high shutter speeds are not really usable now. 1/500 and 1/1000 while they sound good the movement of the curtains are not even. As a result, some parts of the frame came out less exposed than others. It could be fixed by the master of the lubricants, but it would definitely cost a load of money. I decided to wait and until it gets fixed I started not to use these speeds. It seems everything works fine up to 1/250s and I have managed to carry out my second roll without any problem.

Mirror

The silvering of the mirror is damaged badly around the edges and it has a negative effect on the clearness of the viewfinder. There is no way to fix the mirror because the silver just melted down. The only solution is the complete replacement, but as I use this camera casually only I decided to keep it as it is for a while.

The way it looks

Exakta Varex IIa
Exakta Varex IIa top
Exakta Varex IIa back
Exakta Varex IIa bottom
Exakta Varex IIa back open
Exakta Varex IIa back opened
Exakta Varex IIa Lego

Personal experience

As you have already figured out I like this camera the most because of its appearance. I think it really does look gorgeous even though I prefer more the versions with the engraved or embossed logo on the front plate. Despite this not too serious concern, I feel like holding something really special when I choose this for a walk. For me it is an outstanding experience to carry such a nice piece of history and heritage while I can be almost certain that the camera hanging on my neck is so unique I will probably not meet with anything even close to it. It has its charm and style to not to deny apart from what kind of photos came out at the end. Of course, the shoots are great too, nothing to complain about. What I want to say is that it is so elegant I might walk with it even if it was a bad camera (which is not!).

Exakta on my shoulder
Varex IIa in action

Ergonomics

Well, we have reached the point where I must stop extol this camera because the ergonomics is at least awkward.

The left-handed shutter release is really hard to get used to it. The shape of the body is nothing but convenient. It is in fact quite bulky. The reason is probably practical though,  this shape helps to keep the film more in place and flat according to some opinion and I eventually accept it.

Rewinding the film

To change the shutter speed, you have to pull out the dial and it is the normal procedure in this era, but not really convenient.  To set longer exposures (1/5-12s) you have to operate two dials by setting the main dial to T mode and setting the second for the speed. The film advance lever has an extremely long stroke and the mirror does not return after release.  The film transferred from one spool to another in the opposite way as it is usual as the system is left-handed, and to rewind the film you have to pull and turn a couple of things at the same time. Overall many things are a little bit complicated.

All in all this camera is the hardest to use among those I have ever tried. It is at least challenging and not as straightforward as switching your bicycle. But I think it is worth to fight and it is possible to realize that focusing on your left hand is only a habit, not a testament. After you have learned all the tricks it could be as easy to use as any other camera, but for me, it takes some time.

Proper ways to hold the camera while using the waist level finder. The  image is from the original handbook of the camera

This is how to hold the camera while using the pentaprism.

Focusing

Split screen focusing (Die Fotografie magazin 1952)

I have only a pentaprism with split screen focusing glass. It is dark for modern standards, although it could be also because my lenses are not exactly that fast (f/2.8) and the mirror is damaged around the edges. I suppose with a faster lens like a f/1.5 Zeiss Biotar and with a new mirror, it would be bright enough.

The split screen works as intended, but it takes a too big part of the screen (in my opinion) and I often use the matte parts around the central circle to focus instead.

I would love to try the waist level finder also because I prefer that on my Pentacon Six over the prism because of the extra lightness and the presence of a magnifying glass for pin accurate focusing. I don’t shoot much action with these anyway, I have time to focus precisely.

Ground glass vs pentaprism (Dr. Sevcsik Jenő, Fényképezés 1960 book)

Funny feature

There is a feature of this camera which had been hardly used by most and made me think quite a bit until I have found out what it is for. Interestingly enough you can actually cut the film inside the camera with a razor sharp hook-shaped blade. This way you can change film in the middle of the roll without the need for rewinding and calculating the position of the last exposed frame.

The blade is marked with the number 38. The image is from the original handbook of the camera.
Operation of the film cutting rod.

This blade can be seen on above on my photo where the back is open and for reference point please look the point 38 on the draft above. The operation is simple you have to screw out a lock at the bottom of the camera than you have to pull the rod and the blade cuts the film. I have never seen this before and while I am sure I will never use it, still it is a neat little feature. The engineers of Ihagee thought of everything.

Lenses and test shoots

Ihagee didn’t manufacture lenses by itself, but many brands made glass for the Exakta mount.

A very cool page to visit according to these lenses, in general, can be found here, and in detail with illustrations here.

I have got the camera with two lenses: a standard 50mm Tessar and a 100mm Trioplan. The Tessar had to get cleaned and lubricated, but the other lens is in a really nice shape.

Carl Zeiss Jena 50mm f/2.8

There is no Tessar written on the lens nor Carl Zeiss only Jena and a big “T” letter. The reason is that the East German Carl Zeiss Jena was not allowed to use it’s brand name nor the name of the lenses outside of the eastern block because the West German company owned the brand names. Nevertheless, this is a Carl Zeiss Jena Tessar lens and it performs as it should.

The Tessar is a classical construction or base type which consists of 4 elements 2 of them cemented together. These are considered very sharp and having a “hard” character (whatever it means). Because of the good performance, good enough speed and cheap production costs this lens type was very popular and have several siblings such as Elmar, Industar, Primotar, Skopar, Xenar, Ymmar, Ysaron, Belar etc. Apart from the direct relatives, there are many more modifications led to new lens families.

I am going to write a deeper article about this lens as soon as I can get an EOS to Exakta adapter.

Szentendre (Hungary), Exakta Varex IIa @ 1/1000s, Carl Zeiss Jena Tessar 50mm f/2.8, Kodak Gold 200, Canoscan 9900F, high shutter speed fails
Bus station, Gyöngyös (Hungary), Exakta Varex IIa, Carl Zeiss Jena Tessar 50mm f/2.8, Kodak Gold 200, Canoscan 9900F
Budapest(Hungary), Exakta Varex IIa, Carl Zeiss Jena Tessar 50mm f/2.8, Kodak Gold 200, Canoscan 9900F
Underwater chair, Girona (Catalonia), Exakta Varex IIa, Carl Zeiss Jena Tessar 50mm f/2.8, Kodak Gold, Canoscan 9900F

Meyer Optic Trioplan 100mm f/2.8

This is a triplet structure anastigmat containing obviously 3 elements. Although the structure is very simple it allows a relatively fast aperture and also it has the advantage of having no risk to get glued elements separated as there are none of them.

Some of the brothers are Anticomar, Cassar, Novar, Meritar, Radionar, Trinar, Triotar, Voigtar, Eurygon.

The triplet construction does not produce sharp images on large apertures due to the issues with the rays coming from sideways. This problem can be fixed on a level by stopping down. As you can see on the test photos the lens is indeed very soft wide open and it adds some kind of glow to the objects. It could even be beneficial for portraits by delivering a dream-like effect which hides most of the skin imperfectness of the model.

This lens is famous for its bokeh, which contains unusual and for most pleasing circles when shooting wide open. Unfortunately, I have no example taken by me so far, but you can see one here.

Again, I will do a deeper review of this lens as soon as I get an adapter to Canon and have some time to do more research.

Luca, Szentendre (Hungary), Exakta Varex IIa, Meyer Trioplan 100mm f/2.8 wide open, Fuji Superia, Canoscan 9900F
Vetus, Girona (Catalonia), Exakta Varex IIa, Meyer Trioplan 100mm f/2.8 wide open, Kodak Gold, Canoscan 9900F
Clarita and Jose Antonio, Girona (Catalonia), Exakta Varex IIa, Meyer Trioplan 100mm f/2.8 wide open, Kodak Gold, Canoscan 9900F
Girona (Catalonia), Exakta Varex IIa, Meyer Trioplan 100mm f/2.8 wide open, Kodak Gold, Canoscan 9900F
Vetus and SavE, Girona (Catalonia), Exakta Varex IIa, Meyer Trioplan 100mm f/2.8, Kodak Gold, Canoscan 9900F

Links

Post apocalyptic atmosphere

Edifici Narcís Monturiol

I am a huge fan of post-apocalyptic movies, games, and atmosphere overall. In fact, I really would like to participate or work on such a movie one day. Of course being a mortal I have very little chance to do it, but I had to realize that the receipt of post-apocalyptic scenery is actually very simple.

My main ingredients are some early morning mist, a high tech solar cell covered concrete building (very easy to find), an old Exakta loaded with  Kodak Gold and 2 vintage glasses (Zeiss Jena Tessar 50mm f/2.8 and Meyer Optic Trioplan 100mm f/2.8).

For some reason, these shoots remind me of the movie Delicatessen which I can faithfully recommend to watch. OK, there aren’t any high tech in that movie, but the fog creates a similar sensation to me at the opening scenes.

This building, by the way, is a member of the Technological Park of the University in Girona in Spain and I am lucky enough to work in this strange complex. I took these photos a morning during my regular walk to work.

Interesting note that this building is named after Narcís Monturiol i Estarriol who invented the first fully functional submarine. Also interesting the fact that (as far as I know) the solar cells were actually never in use even though the construction has finished around 2009. I hope they will be operational one day. I guess there must be a bit expensive for decoration purposes only. I love the way they look like anyway.

Girona (Spain), Exakta Varex IIa, Meyer Trioplan 100mm f/2.8, Kodak Gold 200, Canoscan 9900F

Girona, Exakta Varex IIa, Meyer Trioplan 100mm f/2.8, Kodak Gold 200, Canoscan 9900F

Girona, Exakta Varex IIa, Carl Zeiss Jena Tessar 50mm f/2.8, Kodak Gold 200, Canoscan 9900F

Girona, Exakta Varex IIa, Carl Zeiss Jena Tessar 50mm f/2.8, Kodak Gold 200, Canoscan 9900F

Girona, Exakta Varex IIa, Carl Zeiss Jena Tessar 50mm f/2.8, Kodak Gold 200, Canoscan 9900F

Girona (Catalonia), Exakta Varex IIa, Meyer Trioplan 100mm f/2.8, Kodak Gold 200, Canoscan 9900F
Girona, Exakta Varex IIa, Meyer Trioplan 100mm f/2.8, Kodak Gold 200, Canoscan 9900F

Roll diary

Introduction

Being a camera addict I usually carry around at least 2-3 cameras of different kinds. Most of the time I have my actual favorite film camera in my bag plus a small compact for measuring the light. This set is mixed up with my medium format madness and the expectation of my family members of having good digital images about family occasions so I frequently bring my budget DSLR.

The fact that I always acting like a packman packed with cameras and lenses has 3 main consequences:

  1. I cannot easily write a “What is in my camera bag” type of post since my bag transforms every week. (Ok, I have 3-4 different setups I  used to carry around depending on my mood.)
  2. My bag is very often reaches the mass of a medium size star with a huge gravity field which attracts more cameras.
  3. I use many different kind of films and sensors so it is hard to select matching images to create unified looking set for a thematic series. It is also happening because I love casual shooting during pointless walks without a concept.

To overcome on the 3rd consequence I decided to use the images of my very last roll of film and present it as a diary recorded in photos. Even though there are different topics covered in this series and the photos were taken during several walks in the last couple of weeks, it has a quite unified look due to the same roll of film.

Diary details

  • Camera: Cosina CSM
  • Lens: Cosinon 55mm f/2.1
  • Film: Fomapan ISO100, 36
  • Developer: Kodak D76
  • Scanner: Canoscan 9900F
  • Period: 2012 Jan-Feb

Morning at the river

We are living very close to the biggest river of Hungary (Danube) and I like so much to have a walk early morning (before work) at the side of it. There is a tiny island I used to visit because it is really quite and peaceful at the mornings especially at this cold part of the year. You can hear an army of birds using twitter though. These shoots were taken on an extremely cold day at the temperature around -20 degrees Celsius.

Afternoon downtown

The place we live in is a quite lovely little town with a great history which I don’t even try to introduce here. It almost all the year filled with tourists and their cameras. Seriously, I could start the local …camerastyle.com site focusing on tourists’ equipment. (I do love these sites: tokyocamerastyle.com, saopaulocamerastyle, csmcamerastyle) Anyhow there are tremendous amount of photos  taken about the town every day so I don’t really feel like to shoot there as much. Still I always find a little detail worth to capture.

Business plate made of shadow 1.

Business plate made of shadow 2.

11

 Bus stops

Bus stops are great contrast against the downtown, they are regularly dirty, covered by graffiti and offensive adverts about products I will never buy (because I spend all my money on film of course).   These are places used by everyone but seemingly belongs to nobody and therefore nobody really cares the way they look like.

Cosina CSM, Cosinon 55mm f/2.1, Fomapan 100, Kodak D76

This photo is digital, taken with my Ricoh GR Digital camera. Please consider it as a “making of” photo.

Sunbath

Cosina CSM, Cosinon 55mm f/2.1, Fomapan 100, Kodak D76